Quick Guide for dotCMS & Accessibility – June 2018
Training: http://pfw.edu/training
Login: https://authoring.pfw.edu/c
Quick Guide for dotCMS & Accessibility – June 2018
Training: http://pfw.edu/training
Login: https://authoring.pfw.edu/c
Quick Guide for dotCMS & Accessibility – June 2018
Training: http://pfw.edu/training
Login: https://authoring.pfw.edu/c
Quick Guide for dotCMS & Accessibility – June 2018
Training: http://pfw.edu/training
Login: https://authoring.pfw.edu/c
Quick Guide for dotCMS & Accessibility – June 2018
Training: http://pfw.edu/training
Login: https://authoring.pfw.edu/c
Quick Guide for dotCMS & Accessibility – June 2018
Training: http://pfw.edu/training
Help Desk: helpde[email protected]
Page | 1
Login: https://authoring.pfw.edu/c
dotCMS & Accessibility
Note: The recommended browser for dotCMS is
Mozilla Firefox.
Logging In
1. Open Mozilla Firefox and navigate to
http://authoring.pfw.edu/c
2. Log in with your PFW credentials.
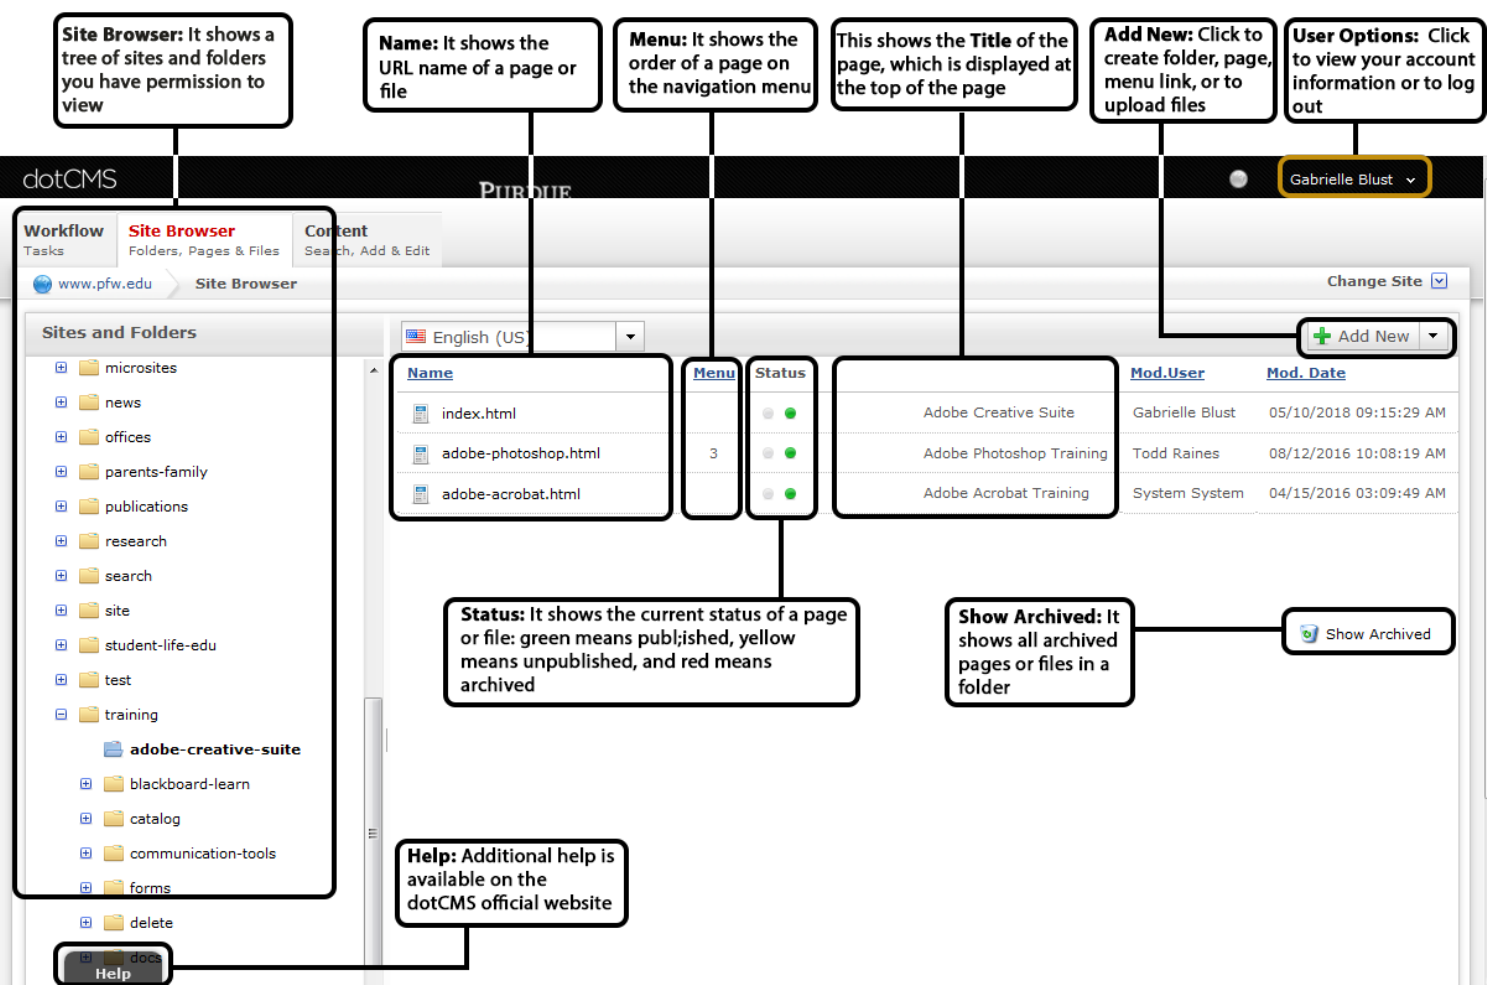
Folders
Creating a New Folder
Note: All folders showing on menu must have
an index page.
1. Right-click the parent folder in which the
new folder will reside.
Note: You may also double-click
on the parent folder and choose
Add New > Folder from the drop-
down on the top right.
2. Click New > Folder.
3. In the Properties window, fill in
the following:
a. Title – Enter the desired name for the
folder (use full names instead of
acronyms or abbreviations).
i. Note: This text will show on the
navigation menu if Show on Menu is
checked.
b. Name (URL) – It will be automatically
filled in after selecting the field.
i. To change the URL: keep it short,
only use lower case, use a hyphen to
separate words, and DO NOT use
spaces between words.
c. Sort Order – Enter a numeric value to
organize the order of folders showing
on the menu (Note: The first item starts
at 0).
d. Show on Menu – Check the box if the
folder should be shown on the menu.
e. Allowed File Extensions – Leave blank
to allow any type of files to be uploaded
to the folder.
i. Or enter *.extension to allow only
certain file types (e.g., *.jpg, *.docx,
*.xlsx).
4. Click Save.
5. To publish, right-click the folder name and
select Publish.
Creating a Sub-folder for Images or
Documents
Note: Image or document folders do not need
an index page.
1. Navigate to the desired folder.
2. In the upper right corner, click the Add New
drop-down menu and select Folder.
3. In the Properties window, fill in the
following fields:
a. Title – Enter images for an image folder
or documents for a documents folder.
b. Name (URL) – It will be automatically
filled in after selecting the field.
c. Show on Menu – Keep it unchecked.
4. Click Save.
5. To publish, right-click the folder name and
select Publish.
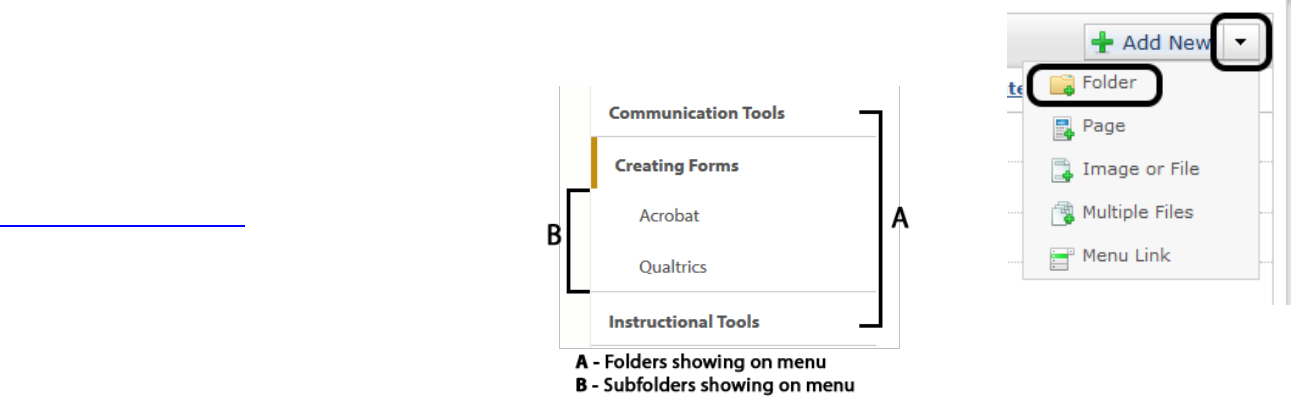
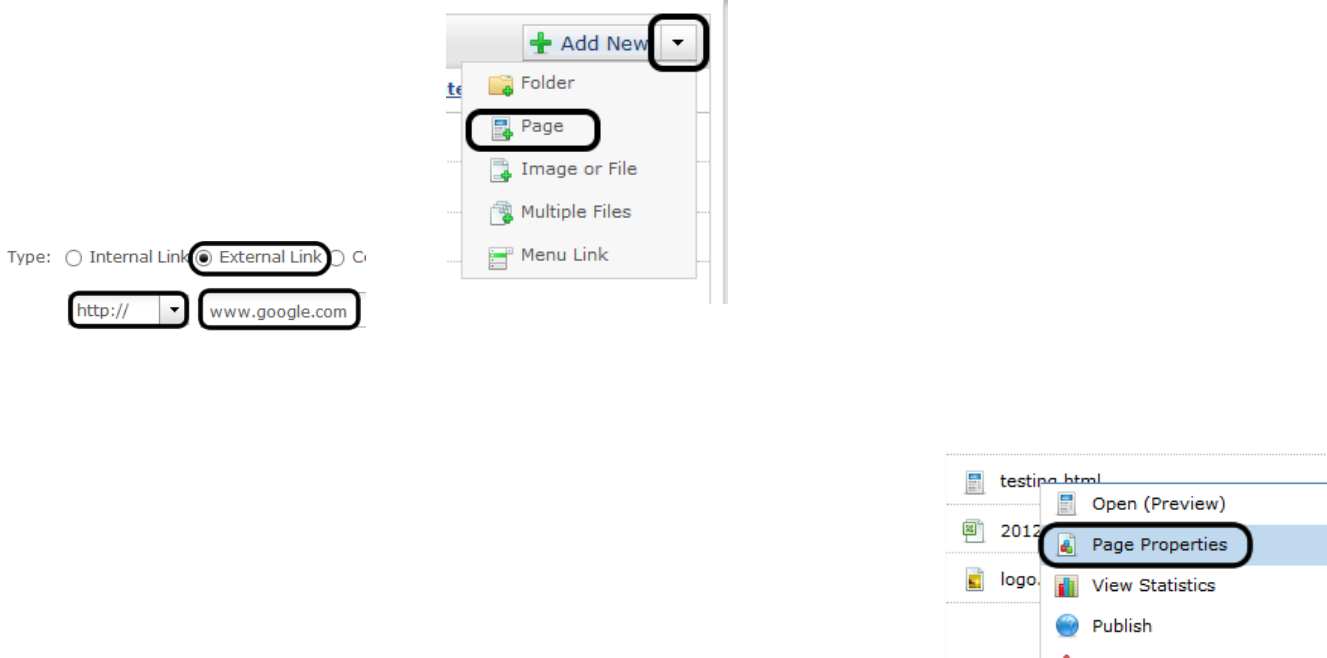
Menu Links
Creating a Menu Link
Note: These steps create a link to an internal
page, external page, or document. The link will
show on the navigation menu.
1. Navigate to the desired folder.
2. In the upper right corner, click the Add New
drop-down menu and select Menu Link.
3. In the Properties window, fill in the
following fields:
a. Title – Enter the desired name for the
link. Use full names instead of acronyms
or abbreviation.
Quick Guide for dotCMS & Accessibility – June 2018
Training: http://pfw.edu/training
Help Desk: helpde[email protected]
Page | 2
Login: https://authoring.pfw.edu/c
i. Note: Text will show on menu.
b. Type – Choose the desired option, e.g.,
External Link for links referring to a
different website.
i. If Internal Link is selected, click
Browse… to locate and select the
desired page/document.
ii. If External Link is selected, click the
first drop-down menu and select the
desired option. Then, enter the URL
in the field next to the drop-down
menu.
c. Target – Choose the desired option in
which the linked page should open.
i. Note: New Window is
recommended for external links.
d. Sort Order – Enter a number to sort the
position of the link on the menu.
e. Show on Menu – Check to show the
link on the menu.
4. Click Save.
5. To publish, right-click the menu link name
and select Publish.
Editing a Menu Link
1. Right-click the menu link name and select
Edit.
2. Edit the desired field(s).
3. Click Save or Save and Publish.
HTML Pages
Note: Some options may change when right clicking
on pages that have been edited.
Creating a New HTML Page
1. Navigate to the desired folder.
2. In the upper right hand corner, click the
Add New drop-down menu and select
Page.
3. A window will pop up. Leave it as Page
Asset and click Select.
4. On the Basic Properties tab:
a. Page/Menu Title – Enter the desired
title. DO NOT use acronyms.
i. Note: Text will be displayed as the
page’s title.
b. Host or Folder – Make sure this has
the folder the new page will be in.
c. Page URL – It will be automatically filled
in after selected the field.
i. If change is needed, use lowercase,
keep it short, and unique to each
page in a folder.
ii. Note: Change it to index.html to
make the page into an index page.
d. Template – Click to choose the desired
template.
5. Click the Advanced Properties tab.
a. Show on Menu – Check if desired.
i. It will show the page’s title on the
navigation menu.
b. Menu Sort Order – If Show on
Menu is checked, enter a numeric
value to sort the order of pages
showing on the menu.
c. Friendly Name – Enter the official full
department name and the
title/description of the page.
i. Separate information using space-
hyphen-space (e.g., Department of
Biology – About Us).
d. SEO Description – Enter a brief
description of the page.
i. Note: Use full sentences.
e. SEO Keywords – Enter keywords,
separated by commas, which would be
used to search for the page.
f. Page Metadata – Leave it blank.
6. Click Save.
Editing Page Properties
1. Locate the desired page.
2. Right-click the page name and select Page
Properties.
3. Click Lock for Editing.
4. Edit the desired field(s), e.g., Template,
Friendly Name.
5. Click Save or Save and Publish.
Publishing a Page
1. Locate the desired HTML page.
2. Right-click the page and select Publish.
a. Note: All related assets needs to be
published before publishing the page.
Quick Guide for dotCMS & Accessibility – June 2018
Training: http://pfw.edu/training
Help Desk: helpde[email protected]
Page | 3
Login: https://authoring.pfw.edu/c
Page Contents
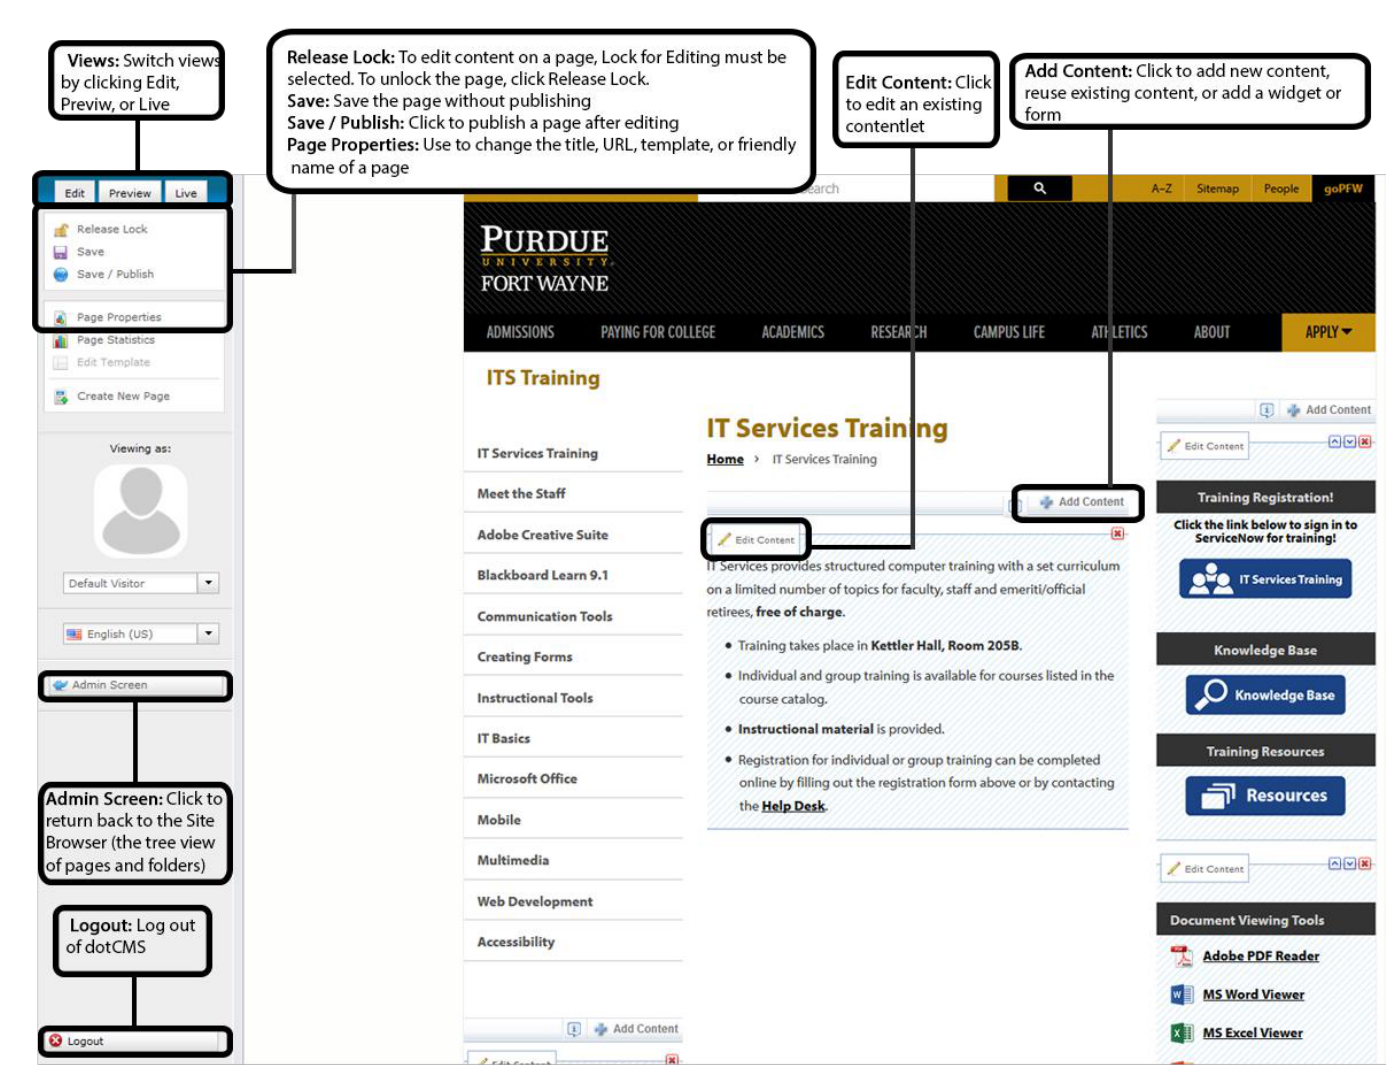
Adding a New Content
Note: A contentlet can be removed from a page
and can be reused on other pages.
1. Locate the desired page and double-click
it. Click Lock for Editing to enter the page
Edit mode. Once you have finished editing
content, click Save or Save / Publish in the
upper left corner to unlock the page.
2. In the upper right corner, click Add Content
> New Content.
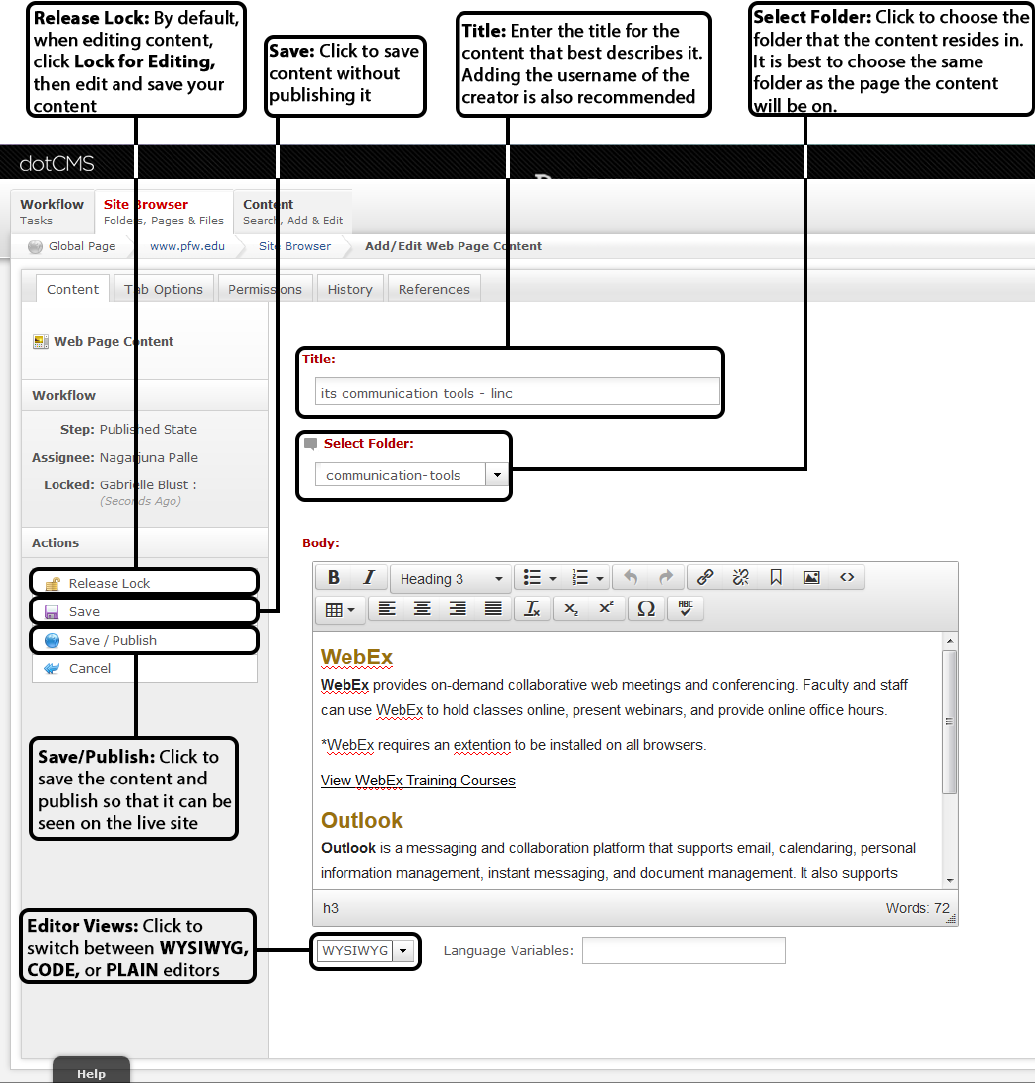
3. In the Title field, enter the department
acronyms, the content summary or topic,
and your username.
a. Example: its quick guide username.
4. Click the Select Folder drop-down menu
and choose the folder that the page resides
in.
5. In the Body text area, type in the text that
will be displayed on the page.
a. Use headings, bold, italic, indent,
bulleted, and numbered lists to format
the text.
b. Note: DO NOT edit colors, font family,
and font size.
c. Note: DO NOT copy and paste straight
from a rich text editor (e.g., Microsoft
Word) or from the Web.
6. To save the content, choose one of the
following:
a. Save – The content will be saved, but
not published.
b. Save and Publish – It will save and
publish the content to the Web.
i. Note: The contentlet will be
automatically visible as soon as the
hosting page is published.
Reusing an Existing Content
Note: When editing a reused contentlet, the
changes made will affect the original as well as
all reused contentlets.
1. Locate the desired page and double-click it
to enter the page Edit mode after clicking
Lock for Editing.
2. In the upper right corner, click Add Content
> Reuse Content.
a. The Search window appears.
3. To search the content, fill out one or more
of the following fields:
a. Title – Enter a part of or whole title of
the contentlet.
b. Select Folder – Click to choose the
folder that may contain the contentlet.
c. Body – If desired, insert word(s) that
exist in the body of the content.
d. Click Search.
4. Locate the desired content in the Matching
Results list.
5. Click Select.
Editing Existing Content
1. Locate the desired page and double-click it
to enter the page Edit mode.
2. Locate the desired content on the page.
3. In the upper left corner of the content, click
Edit Content.
4. On the left side of the page, click Lock for
Editing.
5. Edit the desired field(s).
6. On the left side, click Save or
Save/Publish.
7. Click Cancel to return back to the page
Edit mode.
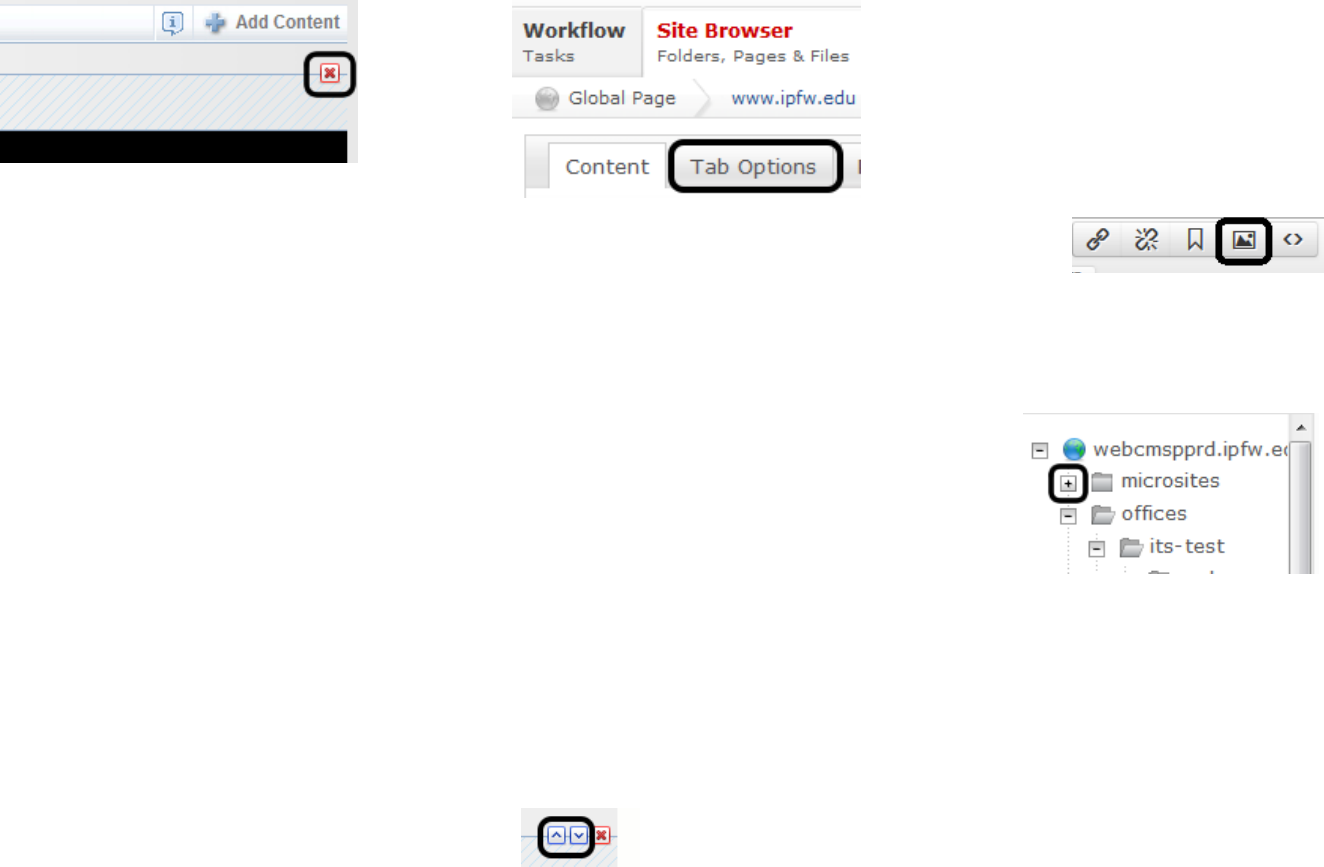
Removing Content
1. Locate the desired page and double-click it
and click Lock for Editing.
2. Locate the desired contentlet.
3. On the upper right corner of the
contentlet, click the X button.
Quick Guide for dotCMS & Accessibility – June 2018
Training: http://pfw.edu/training
Help Desk: helpde[email protected]
Page | 4
Login: https://authoring.pfw.edu/c
4. Re-publish the page.
Tabbed Content
Note: Tabbed content can only be added on
a tab-enable HTML page. You can add a tab-
enable page when creating or editing an
existing page’s properties.
Creating a Tab-enabled Page
1. Navigate to the desired folder.
2. In the upper right corner, click the Add New
drop-down menu and select Page.
3. Fill out the Page/Menu Title and Page URL.
4. Click the Template drop-down list
and select a tabbed template, e.g.,
www.pfw.edu Silver – 2 columns (Left
Navigation, Tabbed).
5. Edit the Advanced Properties.
6. Click Save.
Adding a New Tab Contentlet
Note: You can add up to 5 tabs on a page.
1. Locate the desired tabbed page and double-
click it.
2. Click Lock for Editing. In the upper right
corner, click Add Content > New Content.
3. Edit the Title, Select Folder, and Body
fields.
4. On upper left corner, click the Tab Options
tab.
5. Enter the Tab Title.
a. Note: Text will be shown on the page.
6. Enter the Anchor Link.
a. Note: This is the tabbed contentlet’s
anchor name, e.g., charts (the full
URL of the tabbed contentlet will
then be
www.pfw.edu/training/micros
oft- office/excel.html#charts).
7. On the left side, click Save or
Save / Publish.
a. Click Cancel to return back to the
page Edit mode.
Changing Tab Order
Note: The top most contentlet will be
the left most tab.
1. Locate the desired contentlet.
2. Click the upward or downward
arrow to change the position of the
contentlet.
Adding Images to a Contentlet
Note: All the images must be uploaded
and published into dotCMS before
adding to a contentlet.
1. Navigate to the page to edit. Click Lock for
Editing.
2. Create or edit a contentlet.
a. For existing content, click
Lock for Editing.
3. In the Body text area, place the
cursor at the desired location.
4. From the toolbar, click the
Insert/Edit Image icon.
a. The Insert/Edit Image window appears.
5. On the right of Image source field, click the
Browse icon.
6. On the left, use the plus (+) button to
locate the images folder, example below:
7. Click the images folder and select
the desired image.
8. Enter the Image Description and Title.
a. If desired, click the Appearance or
the Advanced tab to modify
additional image options.
9. Click Insert.
10. If desired, repeat step 2 – 8 to add
more images.
11. Click Save or Save / Publish when finished.
Upload Files
Uploading Images or Documents
Note: All Images should be descriptively
named, edited, and/or resized before being
uploaded (the recommended maximum width
of an image is 400px). Names should not start
Quick Guide for dotCMS & Accessibility – June 2018
Training: http://pfw.edu/training
Help Desk: helpde[email protected]
Page | 5
Login: https://authoring.pfw.edu/c
with a numeral or special characters.
Note: All PDF and document files should be
descriptively named, edited, and accessible
before being uploaded. Names should not
start with a numeral or special characters.
Single Image or File
1. Navigate to the desired images
or documents folder.
2. In the upper right corner, click the Add New
drop-down menu and select Image or File
a. The Add File window appears
3. Click Select
4. Under File Asset, click Browse
5. Locate and open the desired file
6. Once the file is uploaded, enter a
descriptive title for the image or file in the
Title field.
a. The File Name cannot be changed.
7. Click Save / Publish
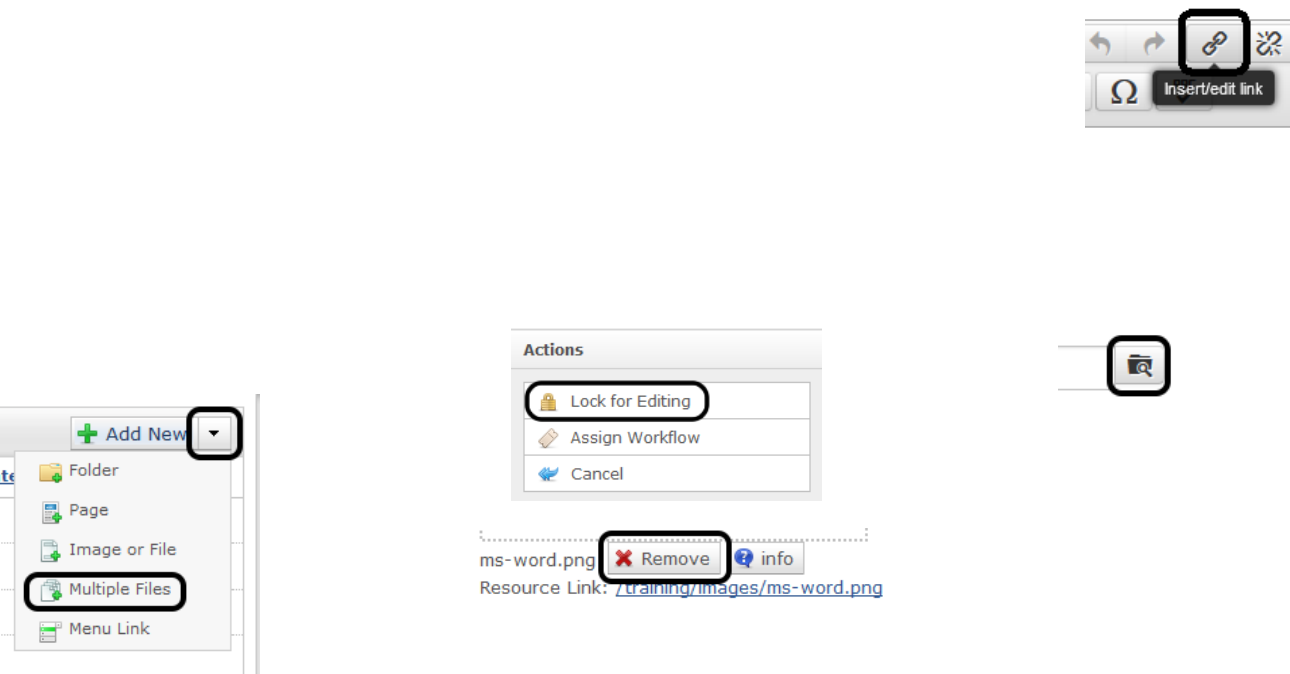
Multiple Files
1. Navigate to the desired images
or documents folder.
2. In the upper right corner, click the Add New
drop-down menu and select Multiple Files.
a. The Add File window appears.
3. Click Select.
4. Click Select file(s) to upload.
5. Locate and Open the desired file(s).
a. To select multiple files, press and
hold the Ctrl key and click the desired
files.
6. Click Save.
Note: Files uploaded this way still need to be
published. To do this:
7. Right-click on each new file and select
Publish or you can also:
a. Double click the files
b. Click Lock for Editing.
c. In the Title field, enter a descriptive
title for the image or file.
d. Click Save/Publish.
Replacing Existing Files or Images
1. Locate the desired file/image and double-
click it.
a. Note: By default, the uploaded file is
locked for editing.
2. On the left side, click Lock for
Editing to release the lock.
3. In the File Asset section, click Remove.
4. Click Browse… to select and Open the
new file.
5. When finished, click Save / Publish.
Links
Note: All links should clearly identify
their target.
Linking to an External/Internal
Page
1. Create or edit a contentlet.
a. For existing content, click
Lock for Editing.
2. In the Body text area, highlight the
desired link text.
3. From the toolbar, click the Insert/Edit Link
icon.
4. For an external link:
a. In the Link URL field, enter or
paste the web page URL.
5. For an internal link:
a. In the Link URL field, click the
Browse icon.
b. On the left side, use the +
buttons to locate the desired
folder.
c. Click the folder and select the
desired web page.
6. Click the Target drop-down
menu and select the desired
option.
a. For external links, Open in
New Window blank is
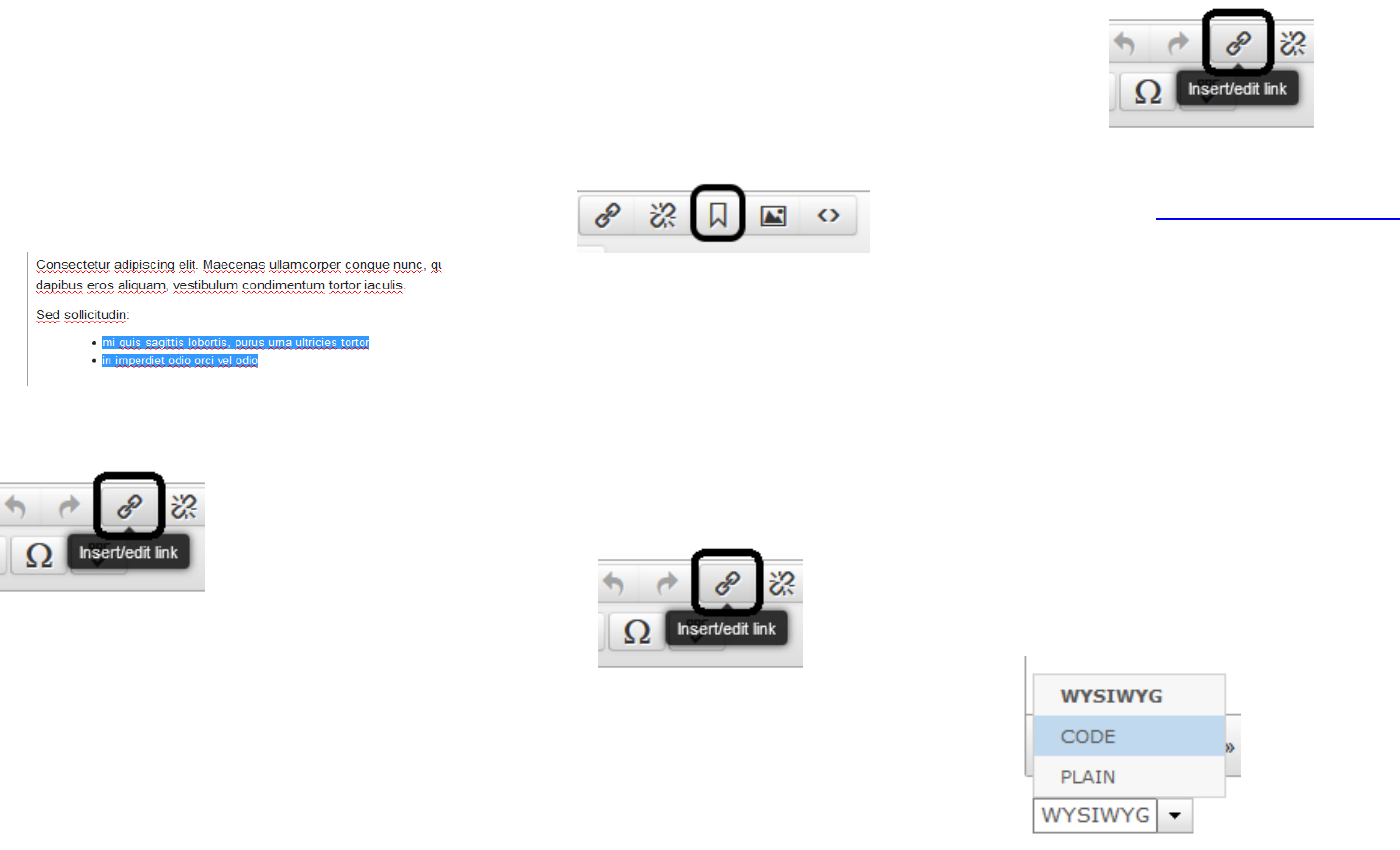
Quick Guide for dotCMS & Accessibility – June 2018
Training: http://pfw.edu/training
Help Desk: helpde[email protected]
Page | 6
Login: https://authoring.pfw.edu/c
recommended.
7. Enter the link Title.
8. Click Insert.
9. Click Save or Save / Publish when finished.
Linking PDFs or Documents
Note: All documents should first be
uploaded to the server before linking.
1. Create or edit a contentlet.
a. For existing content, click
Lock for Editing.
2. In the Body text area, highlight the
desired text, example:
3. From the toolbar, click the Insert/Edit Link
icon.
4. On the right of Link URL field, click the
Browse icon. On the left side, use the plus
(+) button to locate the desired documents
folder.
4. Click the documents folder and select the
desired document.
5. Change the Target option if desired.
6. Enter the link Title.
7. Click Insert.
8. Click Save or Save / Publish when finished.
Creating an Anchor Link
Note: Anchors are used to link to content or to
text up or down on the same page.
Part 1: Create an Anchor
1. Create or edit a contentlet.
a. For existing content, click Lock
for Editing.
2. In the Body text area, locate the text to
link to and place the cursor to the left of
the text.
3. From the toolbar, click the Insert/Edit
tag icon.
a. The Insert/Edit Anchor
window appears.
4. Enter the Anchor Name, click Insert.
a. Note: it should be one word only and
lowercase.
Part 2: Link an Anchor to Text
1. In the Body text area, highlight the text
that will link to the anchor.
2. From the toolbar, click the Insert/Edit Link
icon.
a. The Insert/Edit Link window appears.
3. Click the Anchors drop-down menu, select
the desired anchor.
4. Enter the Title.
5. Click Insert.
6. Click Save or Save / Publish when finished.
Creating an E-mail Link
1. Create or edit a contentlet.
a. For existing content, click Lock for
Editing.
2. In the Body text area, highlight the desired
text.
3. From the toolbar, click the Insert/Edit Link
icon.
a. The Insert/Edit Link window appears.
4. In the Link URL field, enter mailto:email-
address, e.g., mailto:use[email protected]
5. In the Target field, make sure Open in this
window/frame is selected.
6. Enter the Title.
7. Click Insert.
8. Click Save or Save / Publish when finished.
Editing Code
You can edit code if you need to add or adjust
certain aspects that you normally wouldn’t be
able to with the tools already set.
Switching to CODE
You can go in and edit the HTML code
by switching from WYSIWYG to CODE
at the bottom left of the content box.
Quick Guide for dotCMS & Accessibility – June 2018
Training: http://pfw.edu/training
Help Desk: helpde[email protected]
Page | 7
Login: https://authoring.pfw.edu/c
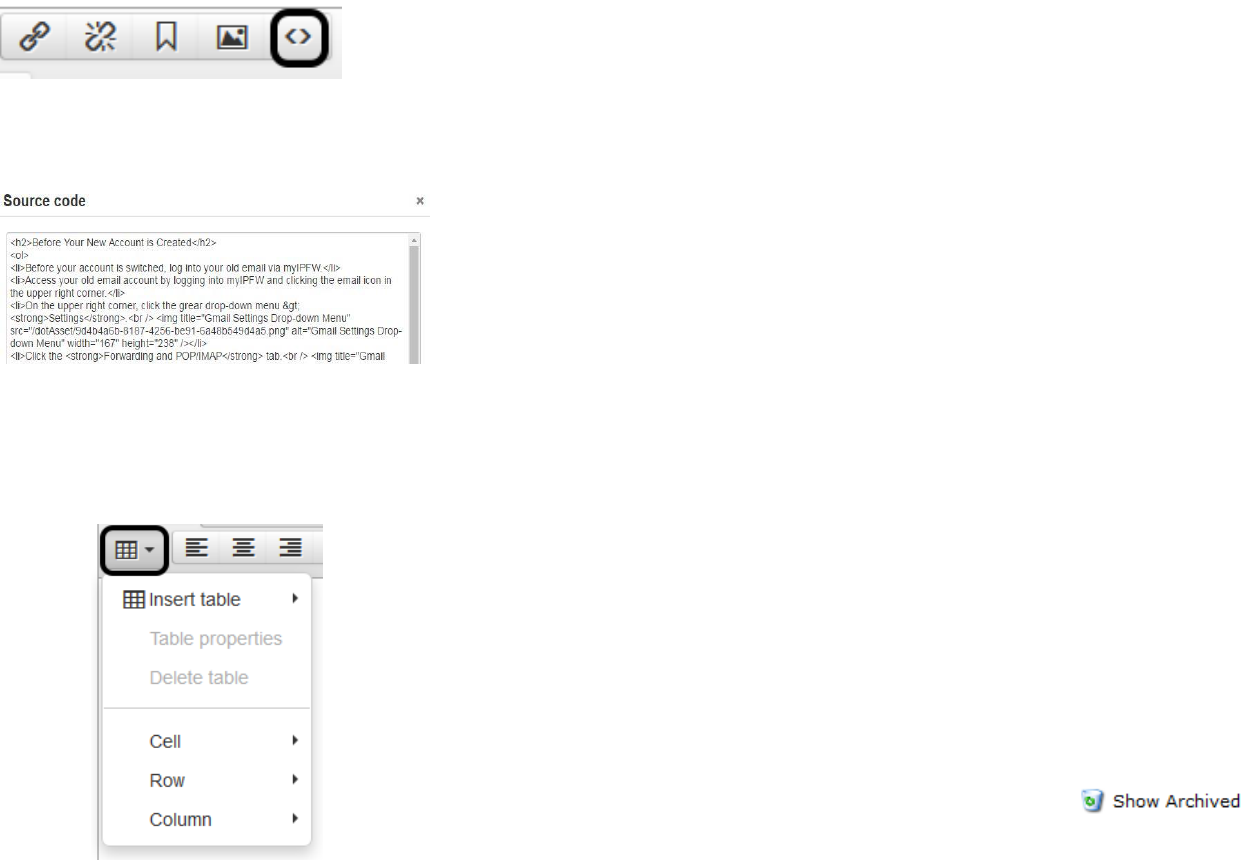
Source Code Button
This button allows you to view the
HTML Source Editor and change the
code without exiting the WYSIWYG.
Once you click the button, a separate
window will pop-up with the Source
code.
Creating Tables
Starting a Table
1. Click the Table dropdown.
2. Add in the rows, columns, and
details you want. This can be later
adjusted by clicking on the
Insert/Edit Table button again or by
editing the code.
3. Click Insert and begin filling in the
cells.
Editing the Table
There are a few different buttons that allow
you to edit certain parts of the table you have
created.
Insert Row Before/After: Allows you
to insert a row before/after the one
your cursor is currently in.
Insert Column Before/After: Allows
you to insert a column before/after
the one your cursor is currently in.
Merge Table Cells: Once you click this
button, a window pops up asking for
the number of columns and/or cells
you want merged based on where
your cursor is at.
Split Merged Table Cells: Once
pressed, if your cursor is where cells
have been joined, it will automatically
split the cells back up.
Deleting Rows or Columns
To delete rows/columns of a table, you
can either:
Click one of the Delete
Row/Column tables by clicking on
the Table dropdown.
Or, you can go into the CODE and
delete rows, columns, and cells
that way.
Archiving a Page/Image/File/Link
Note: This will not delete the piece of
content.
Note: When editing some page, there may be
an option to Archive on the left panel
underneath Lock for Editing, but this does not
archive the page.
1. Locate the desired page or other type of
content.
2. Right-click the content and select
Unpublish.
3. Right-click the content and select Archive.
4. In the Actions window that opens:
a. Leave the options listed under Publish
as listed.
b. Uncheck box listed for Never.
c. Under Expire, select todays date in the
dropdowns as well as a time in the
past. For instance, if it is 10:30 am,
select 10:15 am.
d. Click the dropdown under Push To and
select All Receivers
e. Click Add next to the dropdown, then
click Push.
Note: The page disappears but it’s not deleted
yet.
5. To view archived pages and files, at the
lower right corner, click Show Archived.
a. All the archived items appear.
Deleting an Image/Document/Link
Note: All images, documents, and links must be
unpublished and archived first.
Quick Guide for dotCMS & Accessibility – June 2018
Training: http://pfw.edu/training
Help Desk: helpde[email protected]
Page | 8
Login: https://authoring.pfw.edu/c
1. From the Admin Screen, select the Content
tab.
2. To search for the desired page or file, select
Advanced.
3. From the Type dropdown, select the type
of asset.
4. Type in the Title, Folder, URL, or any of the
other options listed to narrow the search.
5. From the Show dropdown, select Archived.
6. Click Search.
7. Right click on the desired piece of content
and select Delete Contentlet.
8. Click OK in the dialog that pops up.
