
Replacement Window
Installation Guide
Windows without Nailing Fin
tmhsdch
o5
WWW

Project Requirements:
•
Failure to follow these
instructions may void product
warranty.
•
Read guide before starting
installation. Read all warnings
and cautions during installation.
•
Due to ongoing product
changes, updated test results
and/or new industry best
practices, this installation
procedure may change over time.
Visit the manufacturer's website
for current installation
instructions.
•
This product is designed to be
used as a replacement window
installed into an existing “old
style” wood double-hung
window frame.
•
Installation must comply with all
applicable building codes.
•
Existing window frame, wall and
weather-resistant barrier must be
adequate and window frame and
wall must be structurally sound.
•
Window must be installed to be
plumb, level and square.
•
The replacement window should
be approximately 1/4" less in
width and height than the
existing window opening once
the old sash and components
have been removed. Head
expander can be used if up to
1/2" less in height.
•
Instructions are given for
installation from the interior of
the building.
•
Contact local authorities or
waste management companies
for proper recycling and/or
disposal of removed window or
patio door.
•
Visit the manufacturer’s web
site for removal instructions,
additional installation
information and/or guides.
tmhsdcvq“h’““f”
o5
”“
WWWTT
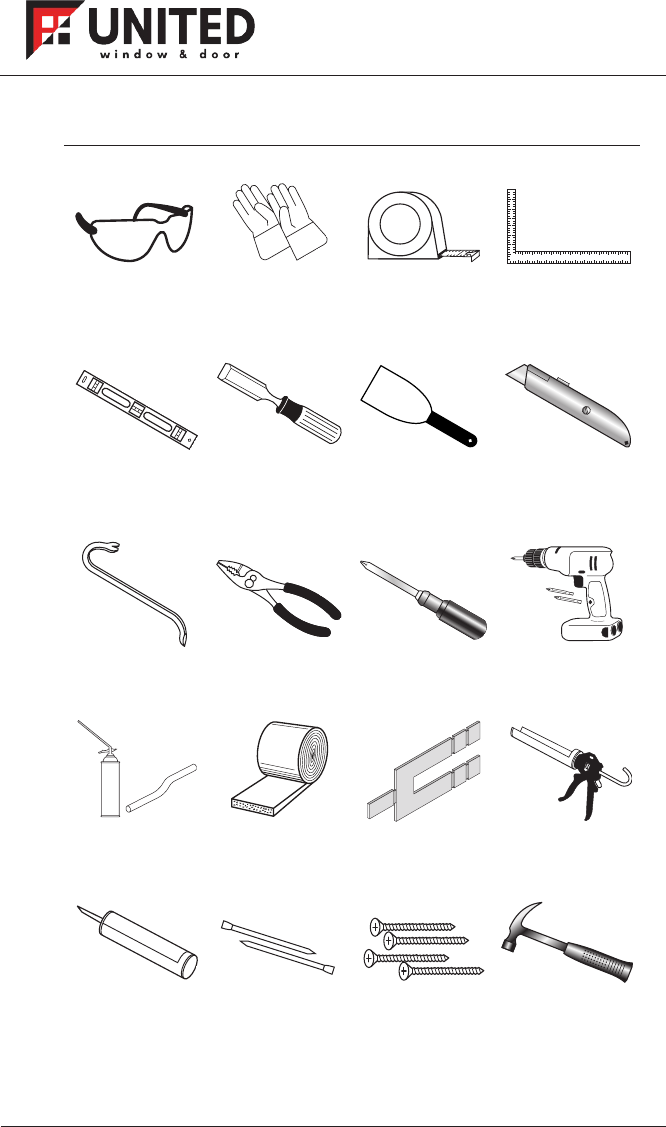
Tools & materials required:
Safety glasses Work gloves Tape measure Framer’s square
4' level Chisel Putty knife Utility knife or other
cutting tool
(as needed)
Pry bar Pliers Phillips hand
screwdriver
Power driver
and bits
Backer rod/
Minimum expanding
foam sealant
Fiberglass insulation Shims Caulk gun
Interior and exterior
window grade
sealant
Finish nails
4 - #8 x 2" flat head
screws (for single-
hung window
installation only)
Hammer
thsdchf
o5

Warnings and Cautions:
Do not drill or fasten
through sill. Product and/or
property damage will result
Do not overdrive screws or
nails. Product damage may
result.
Do not overfill with low
expanding foam or over-pack
with backer rod to avoid bowed
jambs.
Do not leave the window
opening unattended, especially
when small children are present.
A fall from the window opening
could cause death or serious
injury.
Unless specifically ordered,
this window does not have safety
glass, and if broken, could cause
injury. Many laws and building
codes require safety glass in
locations adjacent to or near
doors. This window is available
with safety glass that may reduce
the likelihood of injury if broken.
Information on safety glass is
available from your sales
representative.
tmhsdchf
o5
Use caution when working at
elevated heights and around unit
openings. Follow manufacturers
instructions for ladders and/or
scaffolding. Failure to do so may
result in injury or death.
Follow manufacturer
instructions for hand or power tools.
Always wear safety glasses. Failure
to do so may result in injury and/or
product damage.
Windows and doors can be
heavy. Use safe lifting techniques
and a reasonable number of people
with enough strength to lift, carry
and install window and door
products to avoid injury and/or
product damage.
Sill weep doors are small parts
and, if swallowed, could pose a
choking hazard to young children.
Support window in opening
while shimming. Failure to do so
may result in injury and/or product/
property damage.
Do not position sash at a 90°
angle. Sash may disengage from
frame and may cause injury.
Contains small parts. If
swallowed could pose a choking
hazard to young children. Remove
and dispose of any loose or easily
removed parts.
Before, during, and after
installation, place all tools as well as
any casing or window parts on a
drop cloth or in a location that will
not pose a hazard to installers,
customers, or property.
Warnings and Cautions:
Remove or cut ventilation
holes in plastic shipping wrap if
window is not installed
immediately or product damage
may occur.
Do not store windows flat or in
the sun or product damage may
occur.
Use masonry screw when
fastening directly into masonry or
through a buck into masonry.
Do not cover weep holes.
Property damage may result.
The use of movable
insulating materials such as
window coverings, shutters, and
other shading devices may
damage glass and/or vinyl.
Follow instructions of foam,
sealant and flashing
manufacturer regarding material
application and compatibility
with this product.
Do not apply any type of film
to glass. Thermal stress
conditions resulting in glass
damage could occur.
Weep holes must face the
exterior and must be located at
the bottom of the window or
product and/or property damage
may occur.
When insulating between
unit frame and rough opening or
between units when joining, DO
NOT over-pack batt insulation or
overfill with foam.
Bowed jambs will result
affecting product performance
and/or proper operation of unit.
Buildings constructed prior to 1978
may contain lead paint which could
be disturbed during replacement.
For more information on proper
management of lead paint, visit
www.epa.gov/lead
Important safety information.
Leave this information for the
building occupant.
tmhsdcvhf
o5
Finishing, Cleaning and Maintenance Instructions:
Do not stain or paint weatherstrip,
vinyl, glass or hardware. Product
damage may occur.
▶ Read and follow finishing product
instructions and warnings on finish
material.
Acid solutions used for cleaning
masonry or concrete will damage
glass, fasteners, hardware, vinyl and
metal flashing.
Protect unit and follow cleaning
product instructions carefully. If acid
contacts unit, wash all surfaces with
water immediately.
Abrasive cleaners will damage
glass and vinyl surfaces.
▶ Clean glass us
ing liquid glass
cleaner.
▶ Clean exterior frame, sash, and
insect screens using mild
detergent and water with a soft
cloth or brush.
▶ For hard to clean areas use a
nonabrasive cleaner, alcohol-
and-water or ammonia-and-
water.
▶ Do not apply any type of film to
insulating glass. Thermal stress
and glass damage can result.
Shading devices (insulated
coverings, shutters, etc.) may
also cause thermal stress
damage.
▶ For continued weather resistance
of sealant joints, follow the
sealant manufacturer’s
recommendations for periodic
maintenance.
Metal fasteners and components may corrode when exposed to
preservative-treated and/or fire-retardant treated lumber. Use approved
fasteners and components to fasten unit. Failure to do so may cause a
failure resulting in injury, property or product damage.
Fasteners:
tmhsdcvhf
oU5
M
MM
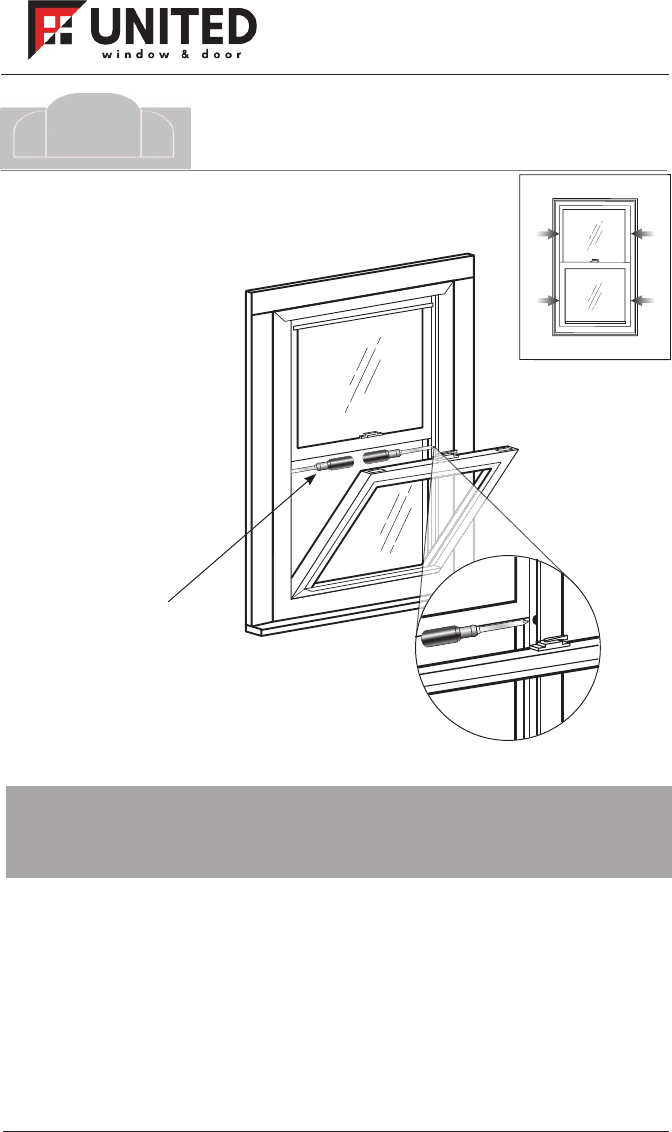
Step 1
One hardware bag containing:
Quantity Item
4 #8 x 2" Pan Head Screws
Hardware Included:
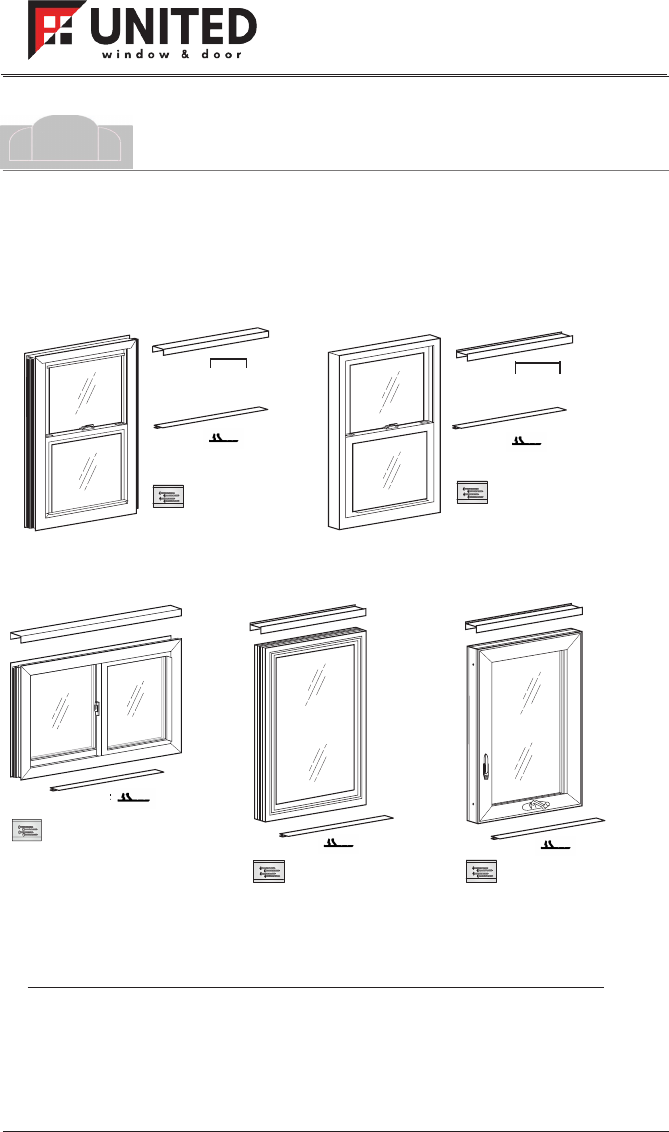
Single-Hung WindowDouble-Hung Window
Inspect new window and verify opening.
Inspect for proper size and condition and verify that all parts are included. Inspect
existing wall and rough opening for structural decay. Repair as needed.
Replacement Windows
Head expander
Sill angle
(appropriate part included)
Screw bag
Screw bag
Screw bag Screw bag
Head expander
Screw bag
Sill angle
(appropriate part included)
Sill angle
Head expander
Sliding Window
Picture Window
Sill angle
Head expander
Casement/Awning Window
Sill angle
Head expander
Interior
Interior
Interior Interior
Interior
thsdcvhf
o75
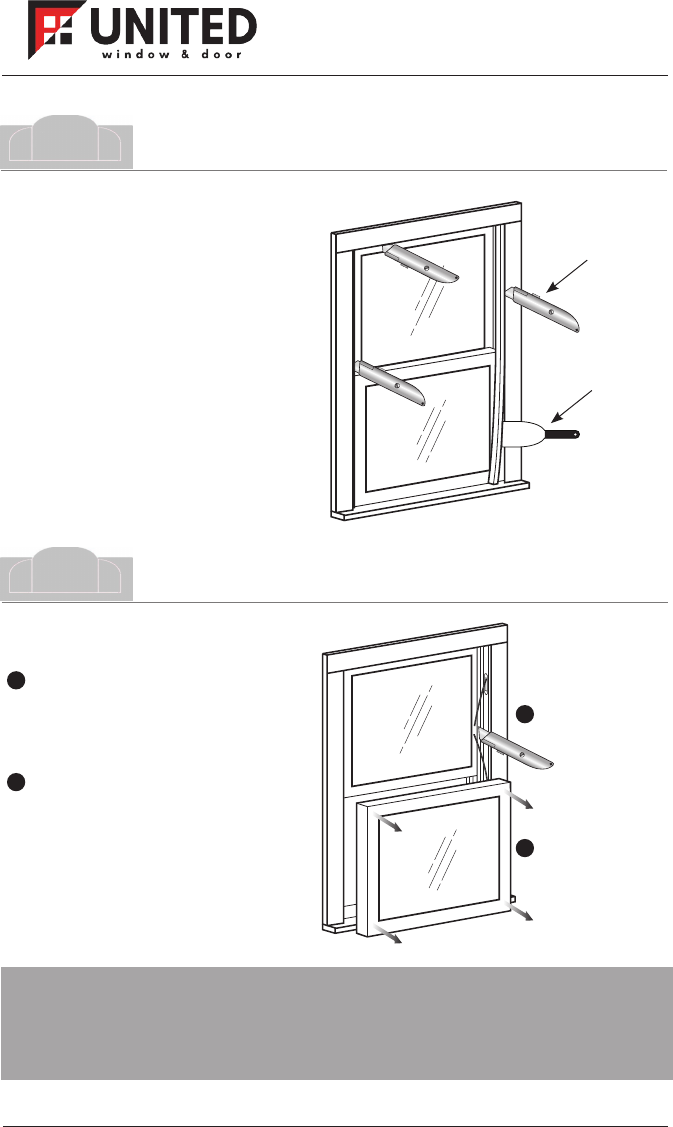
Step 2
Remove interior stops.
Carefully remove interior
stops and save for later use.
Utility knife
Cut
Remove
Putty knife
NOTE: If old window opening has wood top and side
parting stops, proceed to Step 4 Wood Stops. If opening has
metal tracks on the sides, proceed to Step 6 Metal Tracks.
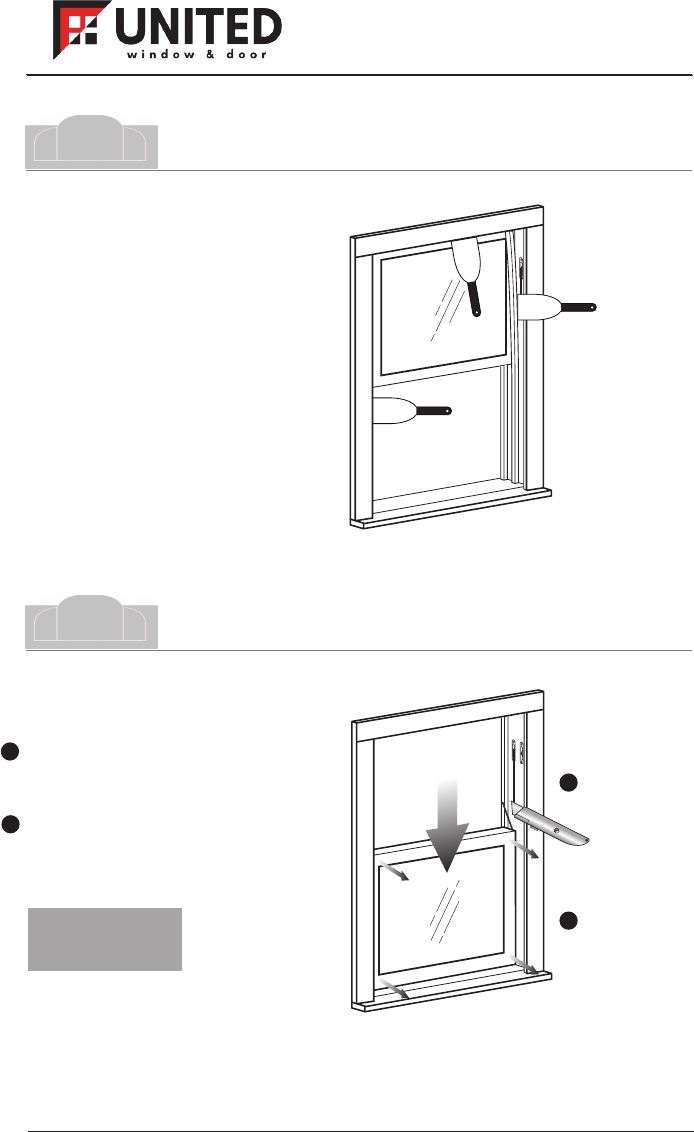
Step 3
Remove bottom sash.
Cut bottom sash balance
cords, if present. Balance
systems may vary.
Remove bottom sash and
dispose of properly.
1
1
2
2
Interior
Interior
tmhsdcvhf
o85
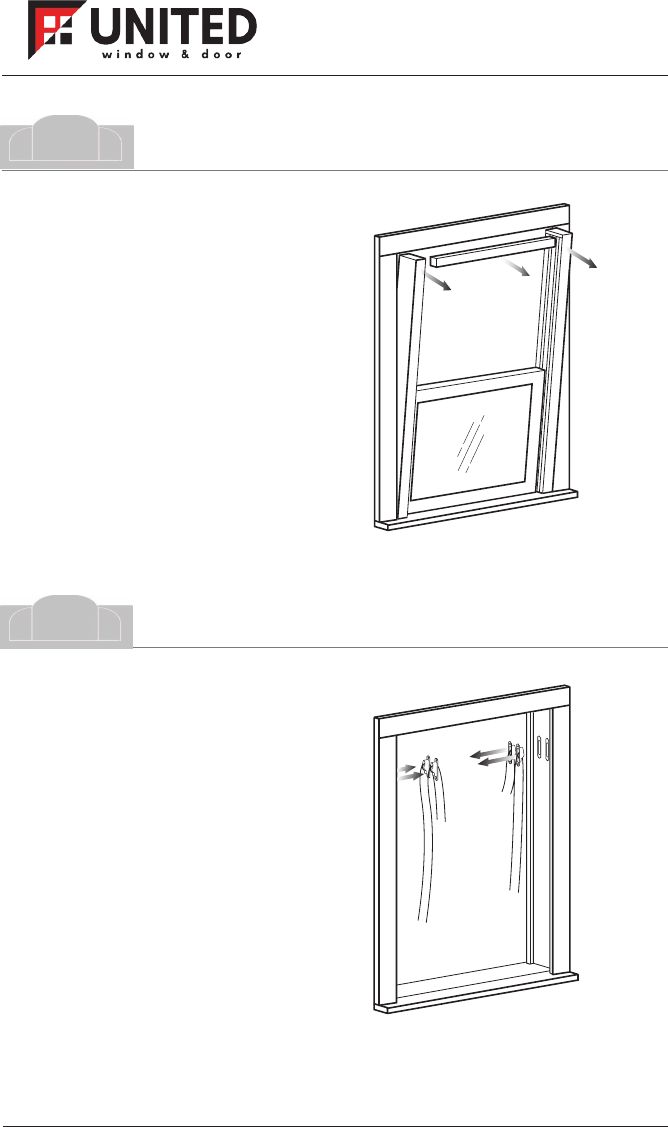
Step 4
Remove top and side
parting stops.
Remove top and side
wood parting stops and
dispose of properly.
Step 5
Wood Stops
Remove top sash.
Lower top sash to sill.
Cut top sash balance
cords, if present. Balance
systems may vary.
Remove top sash and
dispose of properly.
Interior
Interior
tmsdvf
o95
Wood Stops
NOTE: Proceed to
Step 7.
Cut
1
Remove
2
1
2
Remove old balance
system.
Remove old balance
system including any
pulleys and dispose of
properly.
Remove tracks
and top sash.
Lower top sash to sill.
Remove top wood parting
stop.
Remove fasteners that
attach metal tracks/jamb
liners to the sides.
Remove metal tracks and
top sash together and
dispose of properly.
Be careful when removing
metal tracks/jamb liners
as springs may be under
tension.
Interior
Interior
tmhsdcvhf
o05
Step 6
Metal Tracks
Step 7
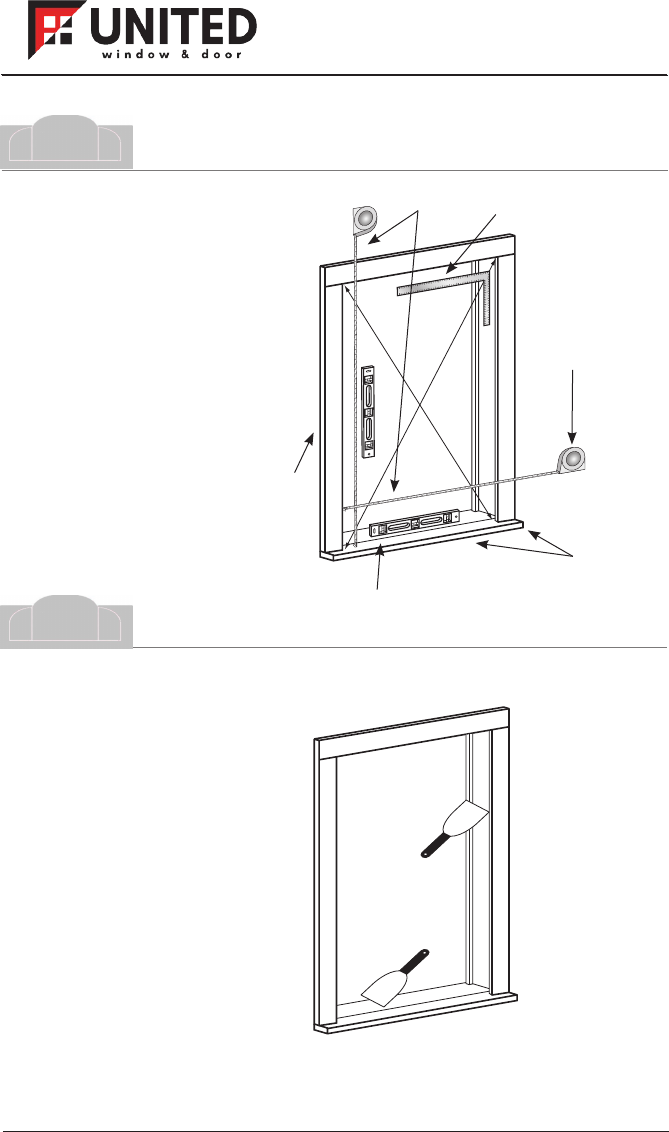
Interior
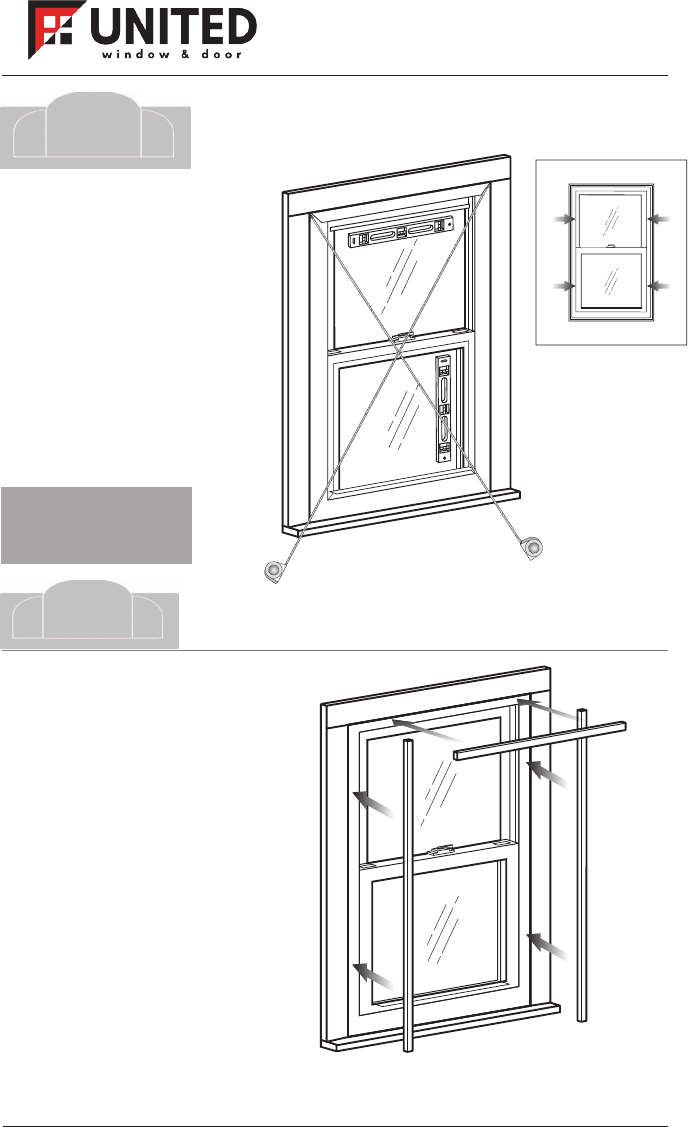
Inspect opening.
Make sure opening is
structurally sound.
Measure the opening at
the smallest width and
height, vertically and
horizontally to verify size.
Remember to check to
make sure the opening is
square by measuring
diagonally.
Measurements must be
within 1/8".
Framer's square
Tape
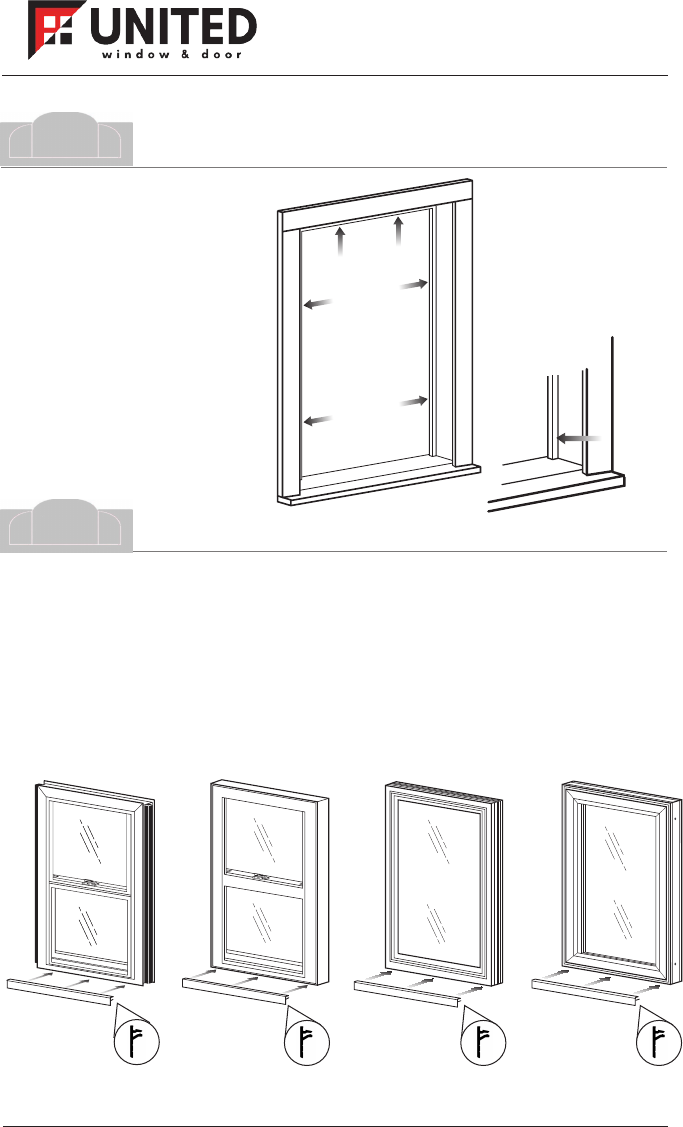
measure
Plumb
Level
Correct size
Inspect to
make sure no
visible water
leakage.
Prepare opening.
Clean opening of all
debris.
Remove any protruding
fasteners.
Insulate any large areas as
needed.
Cover or fill all holes as
needed.
Interior
tmhsdcvqhf
o15
M
MM
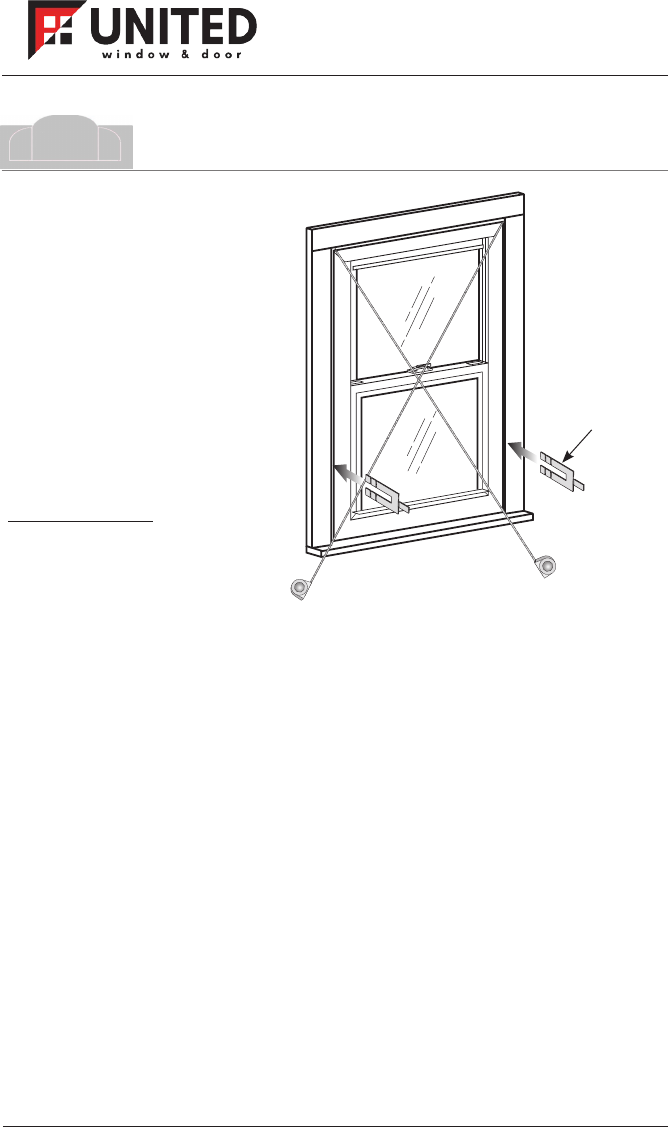
Step 9
Step 8
Verify blind stop.
Leave existing blind stop
intact.
If any portion of the
blind stop is damaged,
the entire stop will need
to be replaced.
Install sill angle if needed.
I
f sill of existing window opening is slanted, install supplied sill angle in
the groove on the bottom of the window. Determine appropriate sill
angle placement for either double-hung or single-hung as shown.
Exterior
Double-Hung
and Sliding
Sill angle
Blind
stop
Sill
Single-Hung
Sill angle Sill angle Sill angle
Interior
Picture
Casement
and Awning
tmhsdcvhf
o25
Step 10
Step 11
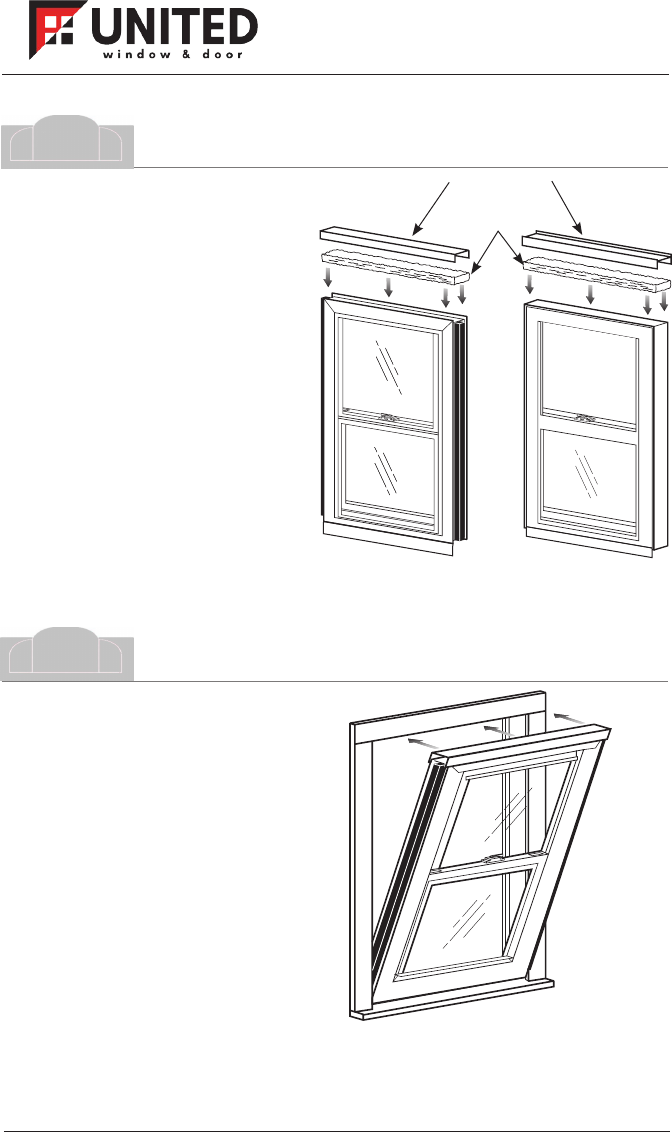
Check fit of window.
Temporarily place window
into opening tilting in from
bottom and check for fit.
Then remove window.
Adjust and trim sill angle as
needed.
NOTE: Shown with optional
head expander.
Exterior
Install head expander
if needed.
If the height of the window
opening is higher than
what will be covered with
interior stops, then place
the supplied head
expander on top of the
window as shown.
It is recommended to add
fiberglass insulation
between head expander
and window.
NOTE: Procedure is
identical for double-hung,
single-hung, sliding,
picture, casement or
awning windows.
Double-Hung Single-Hung
Head expander
Insulation
Interior
tmhsdcvhf
oP35
OOSSTTO
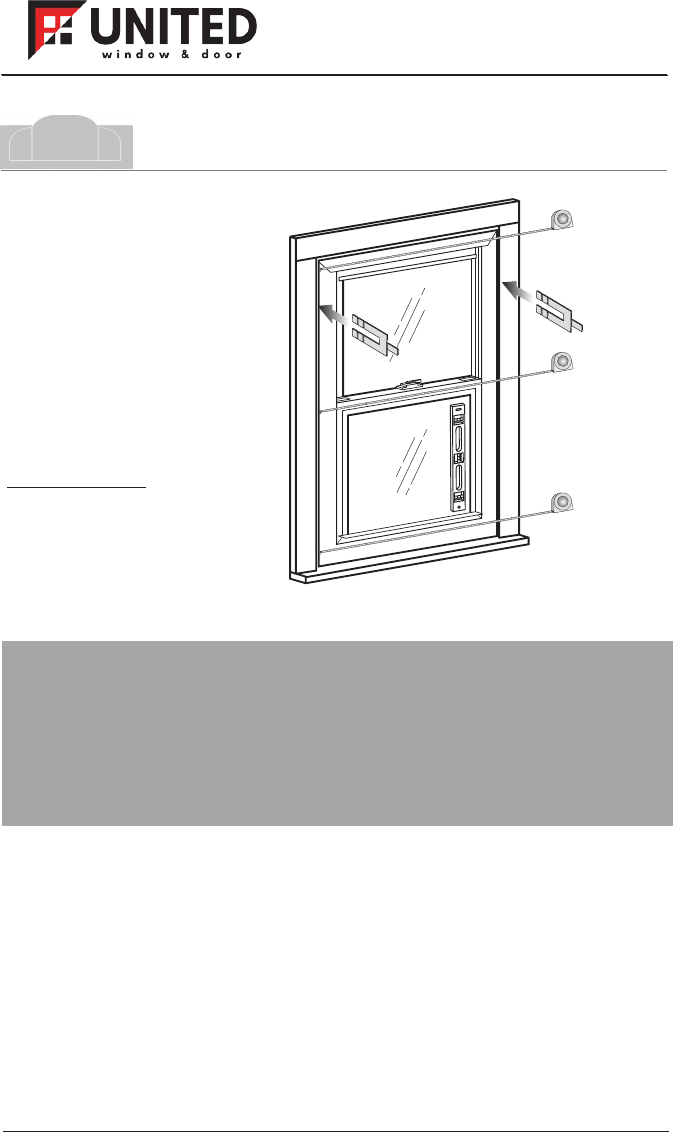
Step 12
Step 13
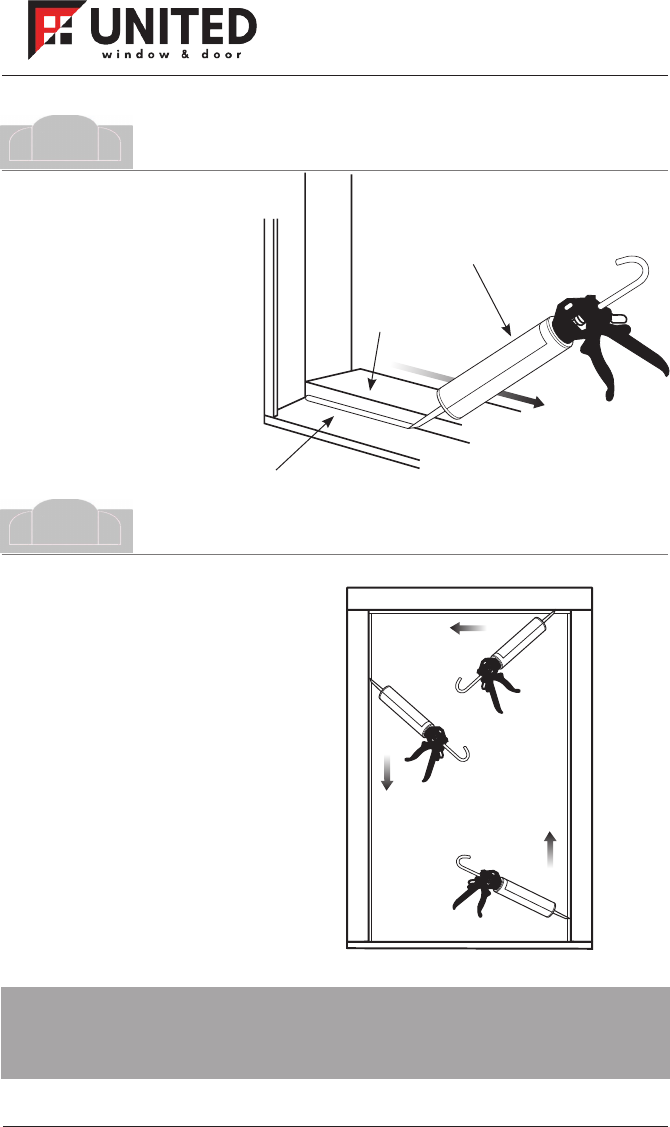
Apply sealant to blind
stop.
Apply 3/8" bead of
sealant to inside edge of
blind stop at top and
both sides.
Apply sealant to sill.
Apply 3/8" bead of
sealant where the
existing stool meets the
window sill.
Caulking gun
and sealant
Stool
Window
sill
Interior
Exterior
If using optional head expander, continue with Step 16. If
not using optional head expander, proceed to Step 17.
thsdhf
o4 5
Step 14
Step 15
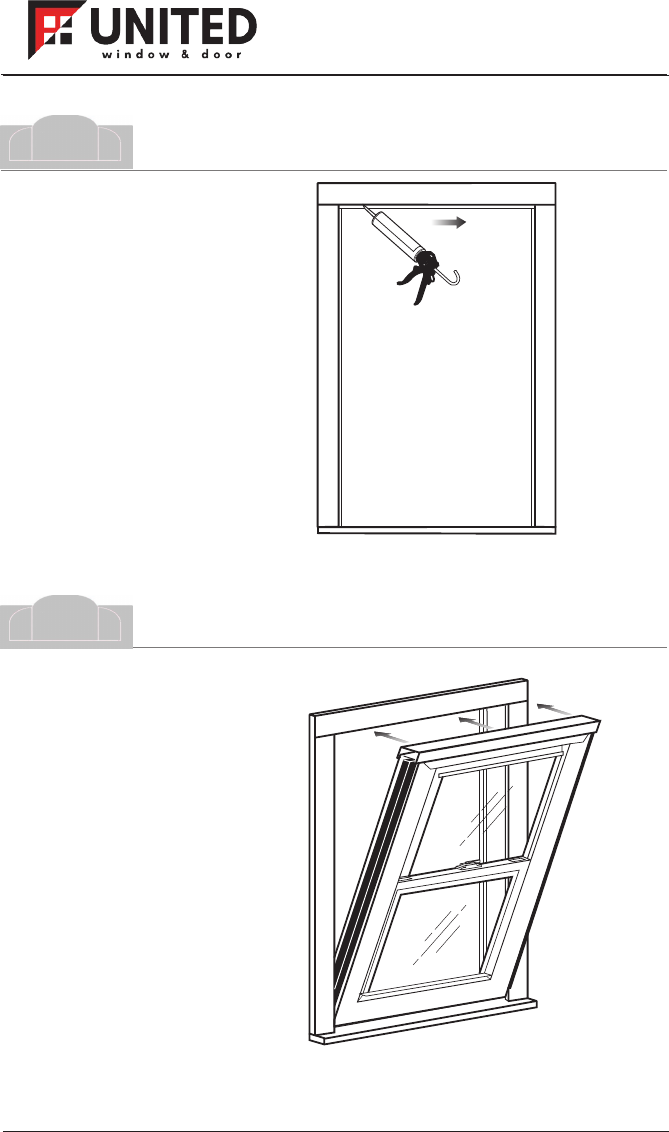
Apply sealant to head
of window for optional
head expander.
Apply 3/8" bead of
sealant to top of window
frame in middle across
the entire width of the
opening if using head
expander.
Place window into
opening.
Place window into
opening, tilting in from
bottom.
Make sure sill angle and
head expander remain in
place if present.
The bottom interior edge
of the window should sit
tight against the stool.
If present, the head
expander should be
pushed up to meet the
top of the opening.
NOTE: Shown with
optional head expander.
Interior
Interior
tmhsdchf
o55
Step 16
Step 17
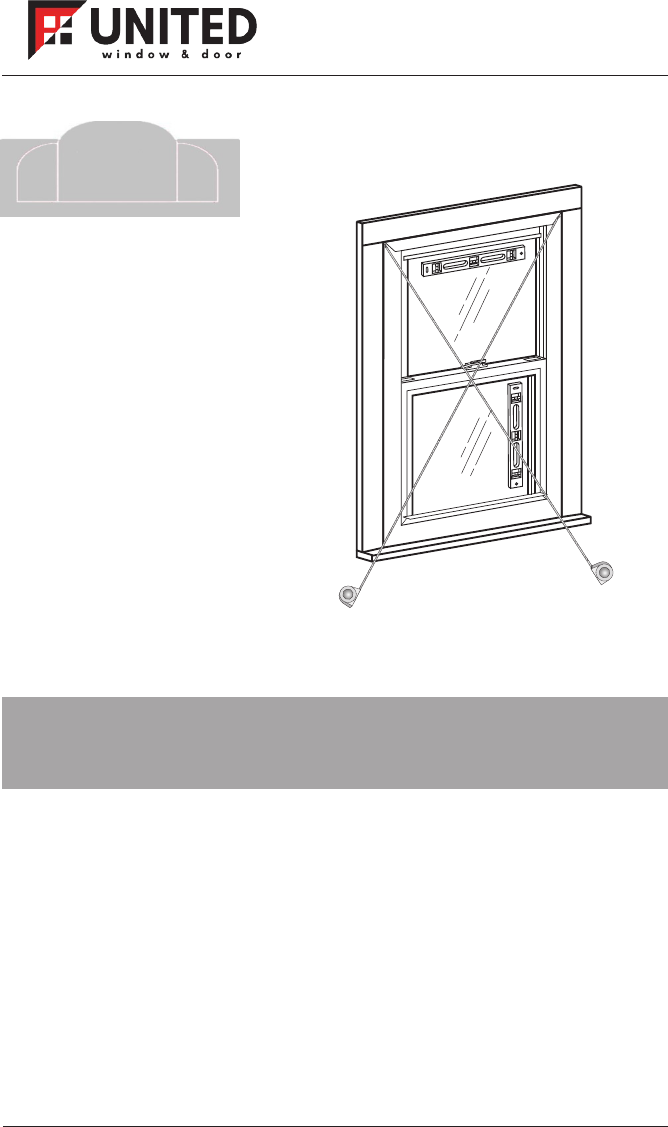
Check for square.
Close and lock window.
Measure diagonally
across unit, upper left to
lower right and upper
right to lower left corner.
If measurements are
within 1/8", unit is square.
If unit is not square, adjust
by inserting shims as
needed.
Do not over shim.
Shim
Interior
tmhsdcvqhf
o6 5
M
MM
Step 18
Check for plumb.
Measure across head,
center and sill of unit.
Center dimensions should
match head and sill
dimensions within 1/8".
Check for plumb.
Shim to straighten side
jambs as needed.
Do not over shim
Interior
tmhsdcvhf
oP75
M
OOMSMSTTO
Step 19
NOTE: If installing a double-hung window proceed to step
20 Double Hung. If installing a sliding, picture, casement or
awning window, proceed to Step 21 Double-Hung, Sliding,
Picture, Casement or Awning. If installing a single-hung
window, proceed to Step 27 Single-Hung.
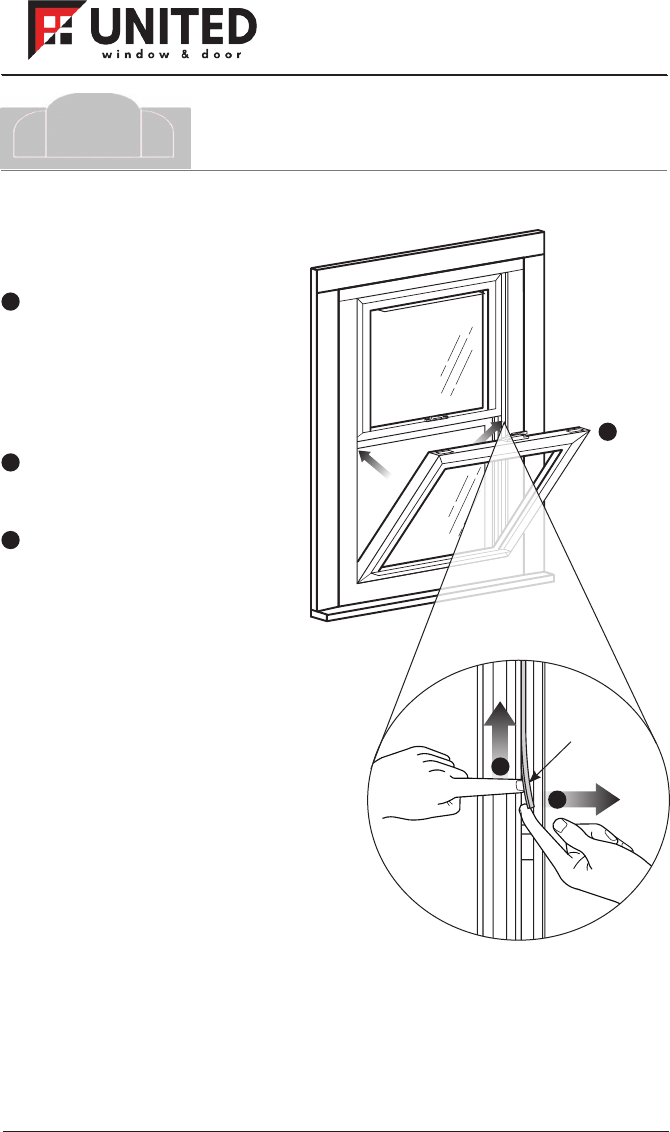
Balance
cover
1
2
Remove balance
covers to access
screw holes.
To access the balance
covers, unlock and
partially raise the
bottom sash. Slide tilt
latches and tilt the
bottom sash in. Rest
sash on sill.
Place your index finger
at the bottom edge of
the balance cover.
Pull the balance cover
out of the jamb
channel.
Repeat to remove the
other balance cover.
Then tilt the bottom sash
back into place.
Save both balance covers
to re-install later.
1
2
3
3
Interior
Step 20
Double Hung
Balance Covers
tmhsdcvhf
o185
SSTT
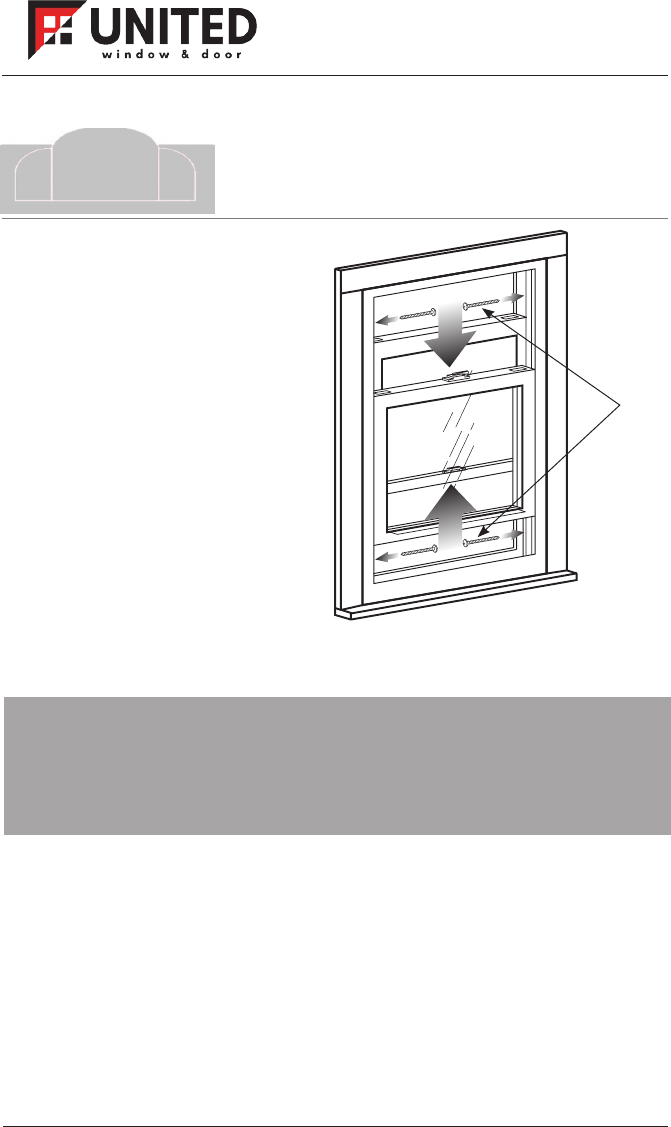
21
#8 x 2"
Pan head
screws
Step 21
Double-Hung, Sliding,
Picture, Casement
or Awning
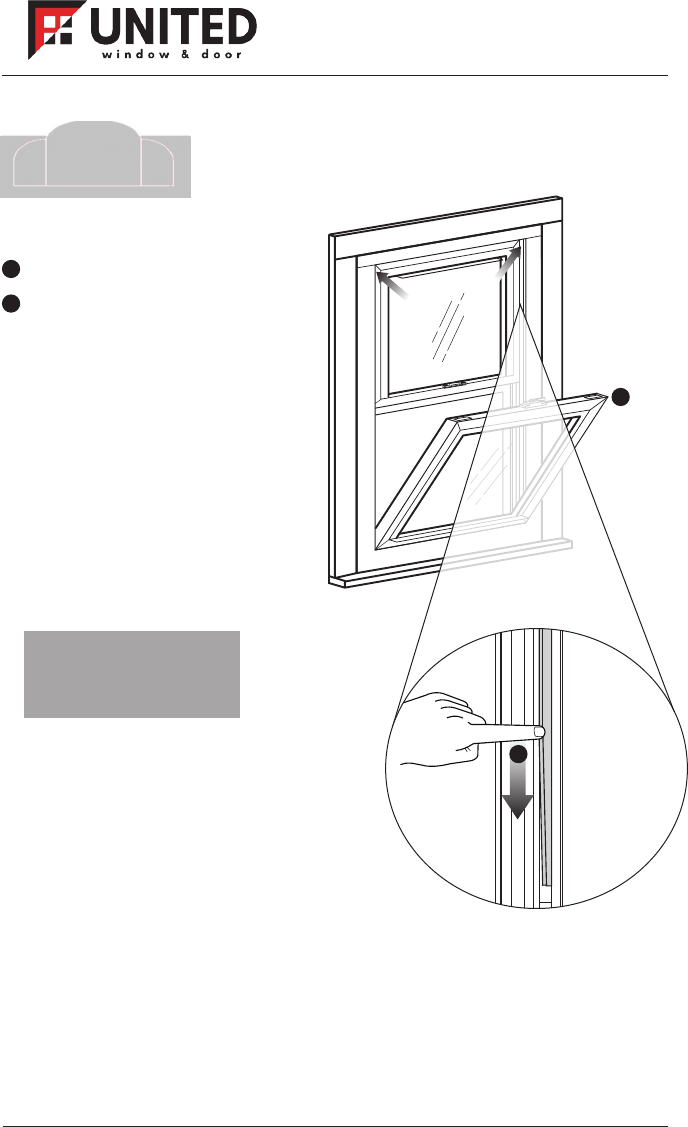
Fasten window.
Unlock window and open
sash to access screw
holes.
Install supplied #8 x 2"
pan head screws into the
2 screw holes in each
jamb.
Do not over tighten as
this may distort the
frame.
Interior
NOTE: If installing a double-hung window, proceed to Step
22 Double-Hung. If installing a sliding, picture, casement or
awning window, proceed to Step 24 Double-Hung, Sliding,
Picture, Casement or Awning.
tmhsdcvhf
o195
NOTE: Proceed to Step 23 Double-Hung, Sliding, Picture,
Casement or Awning.
Phillips
screwdriver
Adjust sides.
To access the jamb
adjusting screws, unlock
and partially raise the
bottom sash.
Slide tilt latches and tilt
the bottom sash in.
Tighten the jamb
adjusting screws located
in the middle of the sides
until the sight lines
between the frame and
sash are equal and
uniform.
Then tilt the bottom sash
back into place.
Step 22
Double-Hung
Interior
tmhsdcqhf
o05
OOSSTTO
Interior
Step 23
Double-Hung,
Sliding, Picture,
Casement or Awning
Check window
placement.
Close and lock window.
Check window for plumb,
level and square.
Diagonal measurements
must be within 1/8".
Check sight lines.
Check sash operation.
Adjust screws and shims
as needed
tmhsdcvqhf
o15
NOTE: If installing a double-hung window, proceed to Step 24
Double-Hung. Otherwise proceed to Step 28.
Step 24
Double-Hung
Balance Covers
Install balance covers.
Tilt the bottom sash in.
Position the balance cover
into the jamb, and make
sure it is tight against the
head of the unit.
Insert the top portion of the
balance cover into the jamb.
Once attached, slide your
finger along the balance
cover down toward the sill,
compressing the balance
cover into the side jamb.
Repeat to install the other
balance cover.
1
1
2
2
Interior
NOTE: Proceed to
Step 28.
tmhsdcvhf
o25
OOTTO
Step 25
Single-Hung
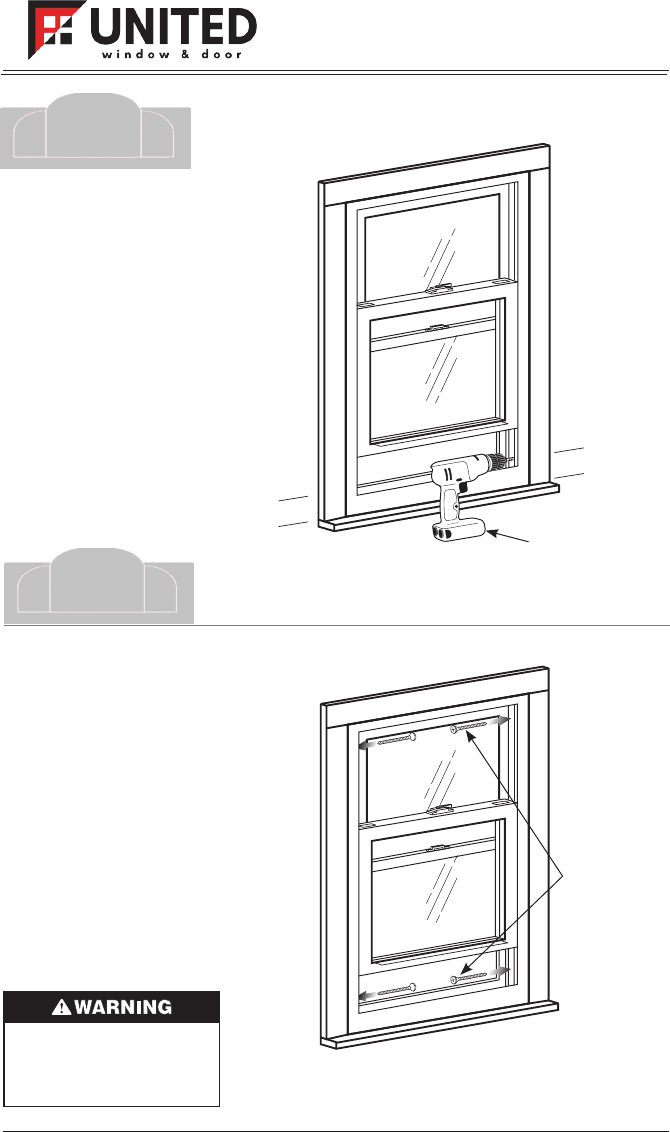
Drill installation
holes.
Open bottom sash.
Drill one 3/32"
installation hole in each
side approximately 2" up
from the bottom to
penetrate structural
supports at least 1".
Power
driver
2"
2"
Interior
#8 x 2"
Flat head
screws
Step 26
Single-Hung
Fasten window.
Install #8 x 2" flat head
screws (not supplied) into
the 2 screw holes in each
jamb.
Do not over tighten as this
may distort the window.
Do not damage balance
cords.
Make sure screw heads
are flush with surface of
window to prevent
interference with sash
operation.
Use caution to avoid
damage to balance cords.
Product failure may result.
Interior
tmhsdcvhf
o35
M
OOMMO
Step 27
Single-Hung
Interior
Step 28
Apply interior stops.
Replace or add, if needed,
interior stops against the
window.
Be careful to not damage
the window.
Interior
tmhsdcvqhf
o45
Check window
placement.
Close and lock window.
Check window for plumb,
level and square.
Diagonal measurements
must be within 1/8".
Check sight lines. Check
sash operation.
Adjust screws and shims
as needed.
NOTE: Proceed to
Step 30.

Step 30
Apply sealant to
exterior.
Apply exterior grade
sealant to the exterior of
window where window
meets framed opening
around entire perimeter.
Fill any old screw holes.
Take care to make sure
that all gaps and holes are
sealed between the
window and the wood
frame.
Do not cover weep holes
on bottom of window.
Exterior
Step 29
Apply sealant to
interior.
Apply interior grade
sealant to the interior of
the window where the
interior stops meet the
window and where the
head expander, if present,
meets the window to seal
any gaps.
Interior
tmhsdcvhf
o55
TT
